Category Archives: Photography

Multi-shot Photography: Alive and Clicking

Sunrise lighting the rocks at Combestone Tor. Panorama from 4 exposures
Camera: Panasonic DC-G9 | Date: 04-11-2020 07:28 | Resolution: 13833 x 3717 | ISO: 400 | Exp. bias: 0 EV | Exp. Time: 1/50s | Aperture: 8.0 | Focal Length: 21.0mm | Location: Combestone Tor | State/Province: Holne, Devon, England | See map

When I first made the transition to digital photography, I got into several forms of multi-shot photography, techniques where you take two or more independent exposures and combine them to get a result not possible with a single frame. As cameras and processing have improved I have sometimes questioned whether these techniques are still required, but after a recent trip to Dartmoor I’ve come to the conclusion that they very much are, and they still suit my style of photography well.

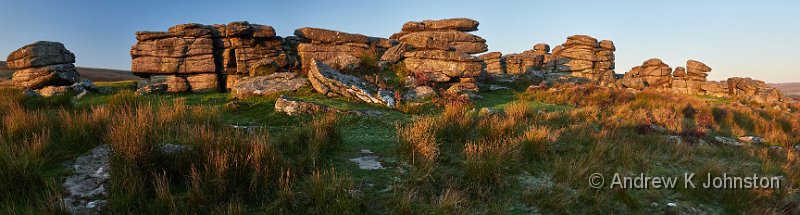
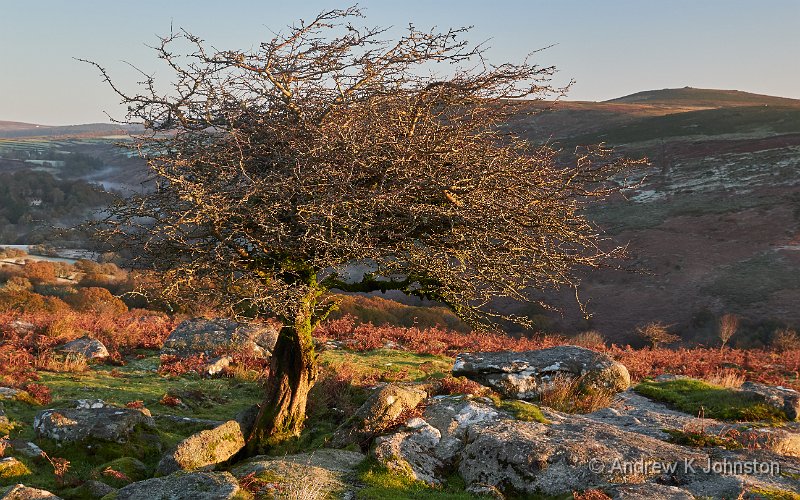
All these images were taken in a single session at a single location: Combestone Tor.
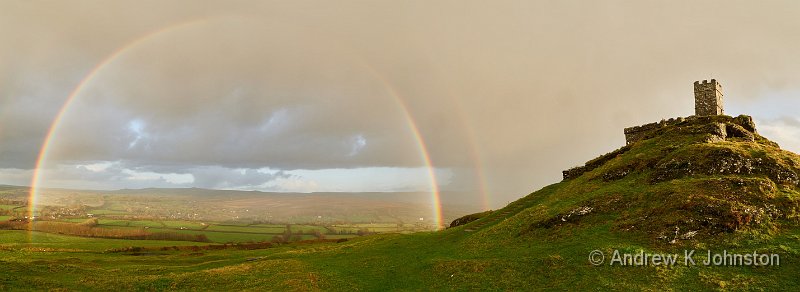
Panoramas

Combestone Tor: panorama from 4 images (Show Details)

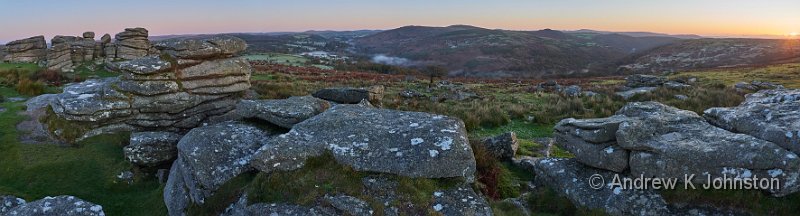
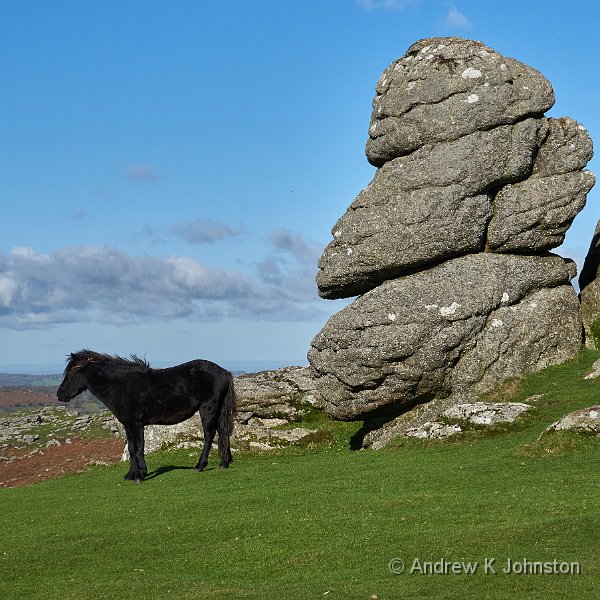
Let’s start with a non-controversial one. Sometimes a scene is wider than your lens, and the subject matter suits an image with an aspect ratio of 2:1 or more. The simple solution is to take multiple shots, rotating the camera between shots, and then join them together after processing. There are few workable alternatives for a high-quality image. You might get enough of the image into one frame with a really wide lens, but my widest lens is 14mm equivalent and I find that it is still not wide enough for a genuine panorama, plus it introduces a number of distortions which are not present in a good multi-shot panorama merging shots taken with a lens somewhere between 28mm and 50mm equivalent. You could use your phone in panorama mode, or a 360 degree camera like the Ricoh Theta, but that’s a compromise on quality. You could go the whole hog and get a dedicated panoramic camera like the Hasselblad XPan, but that’s an expensive film-based option, and means carrying a large piece of “single purpose” kit. None of this is necessary if you have a DSLR or mirrorless camera, or even a point and shoot as long as it has manual exposure control.

There’s a bit of technique required. Firstly you have to either select a scene with little/no movement, or you have to choose a shutter speed and shooting strategy so that moving objects are either blurred consistently (e.g. moving water) or excluded from the overlaps between images (e.g. people). You have to select a manual, fixed exposure and white balance which will work across the image, so check that it won’t be over-exposed at the brightest point, or too far underexposed at the darkest. The exposures need to be made in a controlled sequence (e.g. left to right), making sure that they have sufficient overlap, are level, and have some room to crop at the top and bottom beyond the desired subject matter. All of this is easy using an “advanced amateur” camera like the Panasonic G9 which has a level and shooting guides built into the EVF display, but benefits from practice. If the subject is all at least 3m away there’s no need to worry too much about “rotating around the optical centre” and you can just either twist your body (if working handheld) or rotate the camera on top of the tripod. (Both the panoramas in this article were taken handheld.)
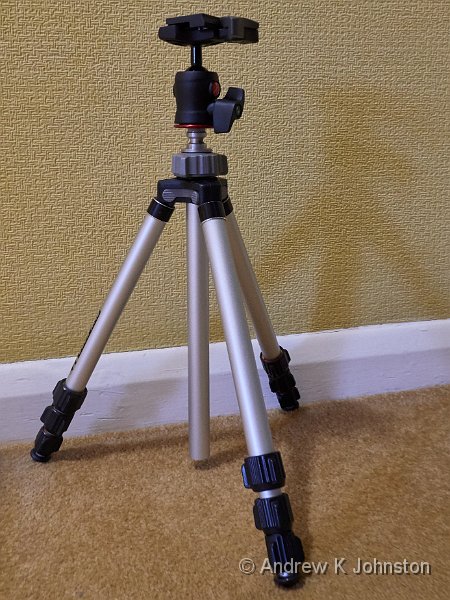
If you do want to include much closer elements then you need to counter the effects of parallax (near objects moving relative to the background between frames). As always there are all sorts of complex, over-the top “perfect” solutions, but I’ve found a very simple yet reliable one: I have a plate about 6” long with a tripod screw hole at one end, and a slot with a 1/4” screw (the same size as a standard tripod fixing) at the other. I mount the camera with the tripod attached to the plate’s screw hole, and the camera attached to the other end of the plate so that the front lens element is positioned roughly over the centre of the tripod. Rotate the tripod head and the camera rotates around its optical centre. This approximate method is good enough to eliminate parallax issues in all but the most extreme cases.

There are a number of options for processing the images. I process the RAW files in Capture One, making sure I apply the same exposure and colour corrections to all frames, and also ensuring that the images are not cropped at all at this stage (Capture One’s Copy and Apply Adjustments functions work perfectly for this). I then drop the developed JPEG files into Autopano Giga to create the finished panoramas. Autopano does a pretty good job of automating most steps, but you have full control including a range of different projections for the panorama if needed.
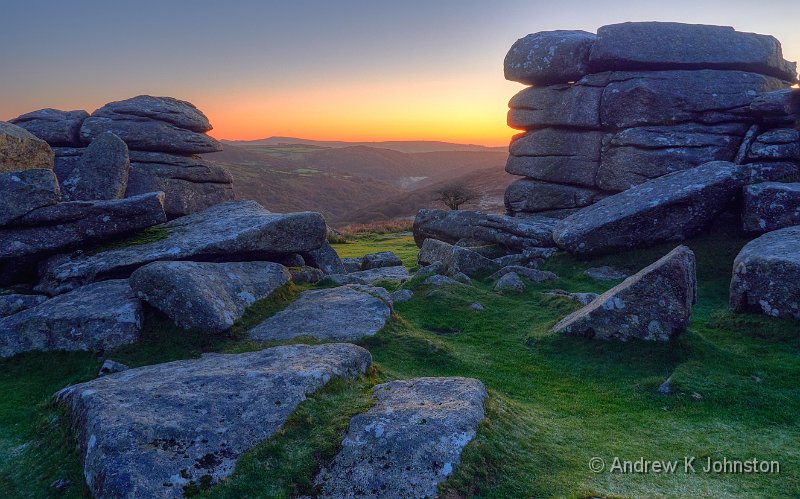
 

HDR

Sunrise over Coomestone Tor (Show Details)

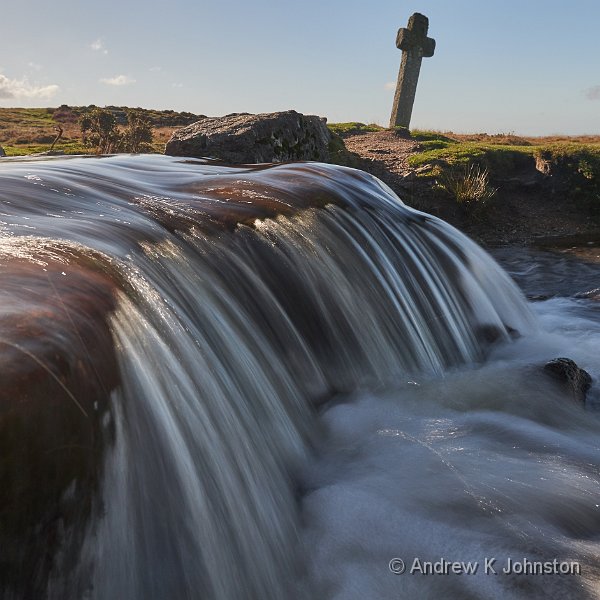
There seem to be four schools of thought regarding multi-shot HDR…

“You can get any shot using ND grad filters if you know how to use them properly”. This is complete rubbish. Now I have no desire to diss generations of hard-working landscape photographers who have done their best with the available tools, and there are many great photographs taken with ND grad filters which I truly admire. However the reality is that this is a painstaking, static method and unless there’s a pretty straight horizon between the areas of different lighting there are going to be major compromises. Look for mountains with the top much darker than the bottom, or trees and rocks arranged against others when breaking the horizon would be a much more dramatic composition.

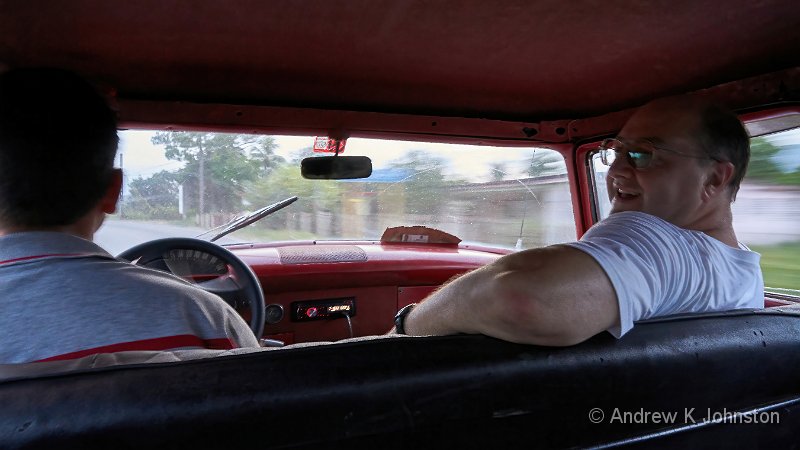
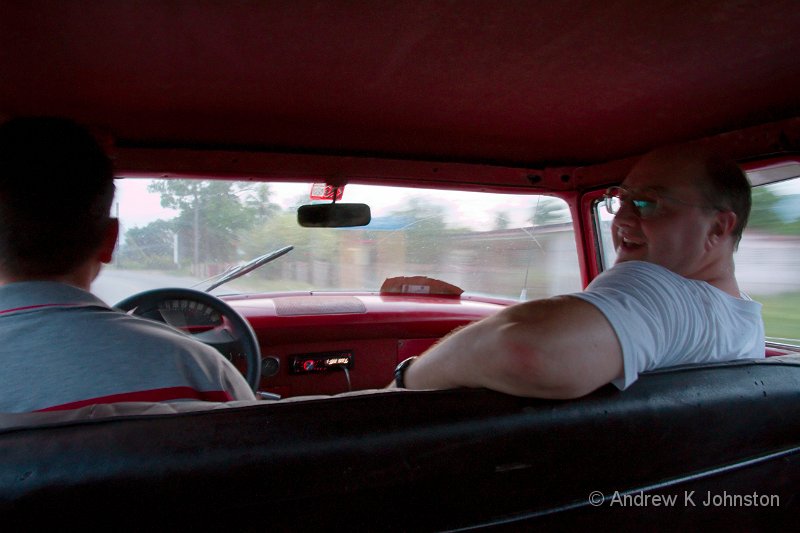
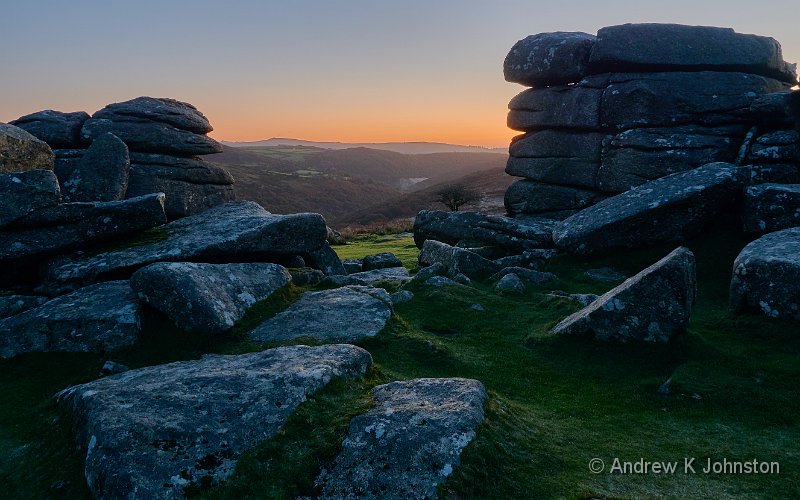
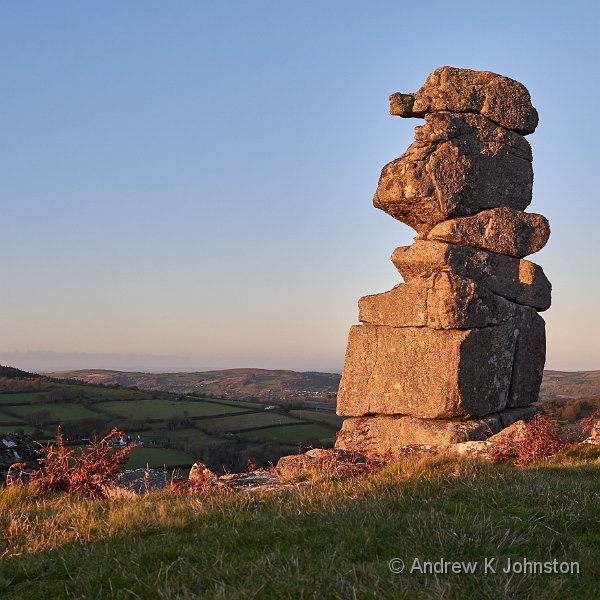
“With modern cameras and processing there’s no longer any need for HDR”. This is partially true. With the increased dynamic range of modern sensors, and better highlight and shadow recovery, you may be able to get much of the same result from a single frame. The following is my attempt to re-create the image above but from a single original. There’s a trade-off: the single image version is likely to be sharper and look more “natural”, the HDR version may be more dramatic. There are also hard limits: no single image will capture a dark interior with a well-lit scene outside the window.

Sunrise over Combestone Tor. Single exposure version. (Show Details)

“If you can’t get an image using the first two methods it’s not worth taking.” Pure, unadulterated snobbery. There’s a closely related version “I like to get things in one shot rather than messing around on the computer”. By all means choose not to take such an image, but accept that doing so is a limitation of your technique, and may disbar you from getting a great image.

“HDR still has a role to play, but needs to be used carefully and appropriately”. Absolutely correct. With a modern camera and processing software it’s an easily-accessible tool which you can use when it’s useful to do so. If you have a way to set up your camera to take a high speed exposure bracketed sequence you have the best of both worlds – develop a single frame, or use several for HDR, or both, and make the choice at your leisure after the shoot.

Like any multi-shot technique you need to pay attention to any moving elements, and you also need to check the shutter speed on the slowest frames. I can usually take HDR brackets hand-held, but the slowest frame for the image above was 1s, and I did need my tripod!

There are numerous options for developing such images. My solution is to develop the RAW files in Capture One, applying any desired crop and with the option to further tweak the exposure per frame if required, and then combine the JPEGs in Photomatix Pro.
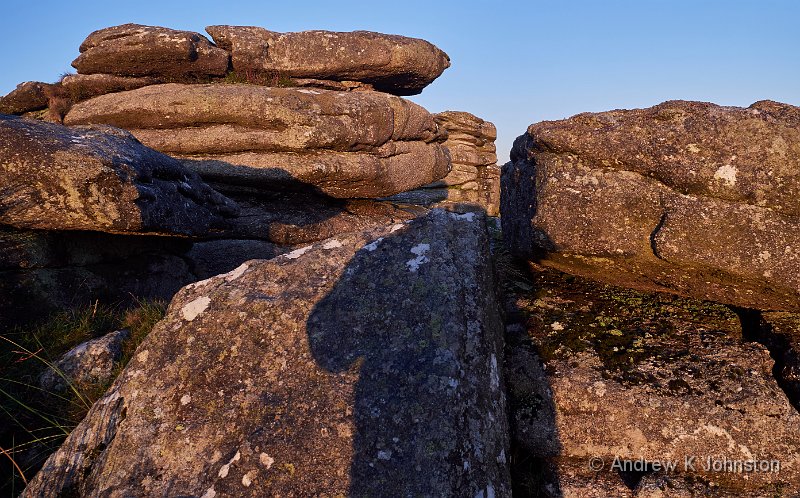
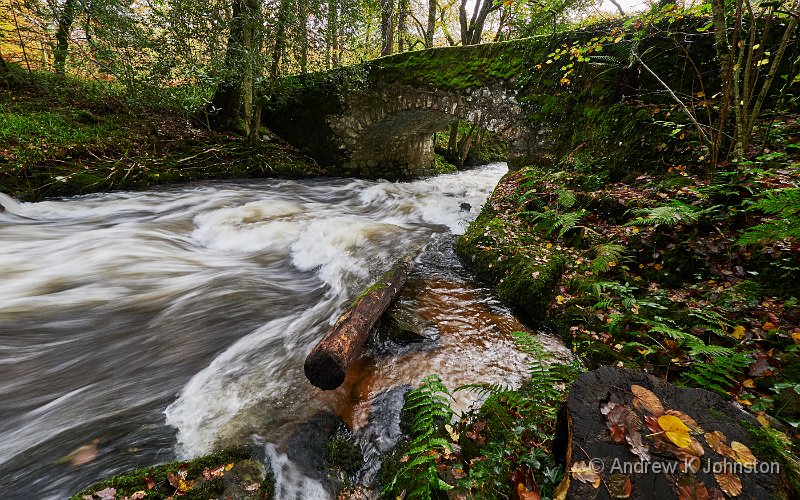
 

Focus Stacking

Detail in depth: focus blend from 6 exposures (Show Details)

Just as a single image may not be able to capture the breadth of a scene, it may not be able to capture it’s depth, at least not all in focus. To get a close-up object and those further away all sharply focused then you have to use a smaller aperture, but you may hit the limits of your equipment, or simple physics. The effects of diffraction become noticeable above about f/6.5 for a 20MP micro-four thirds camera, and above about f/8 for a 50MP full-frame camera.

At this point you can choose to ignore the softness of the more distant elements, you can increase the f-number further and accept some loss of overall sharpness, or you can use a larger aperture and throw the more distant elements deliberately out of focus. These are all valid artistic choices, but they are work-arounds, not resolutions.

However if you’re in an environment which supports multi-shot photography there’s a further option: take a set of images bracketed at different focal distances, and use focus stacking software to combine them.
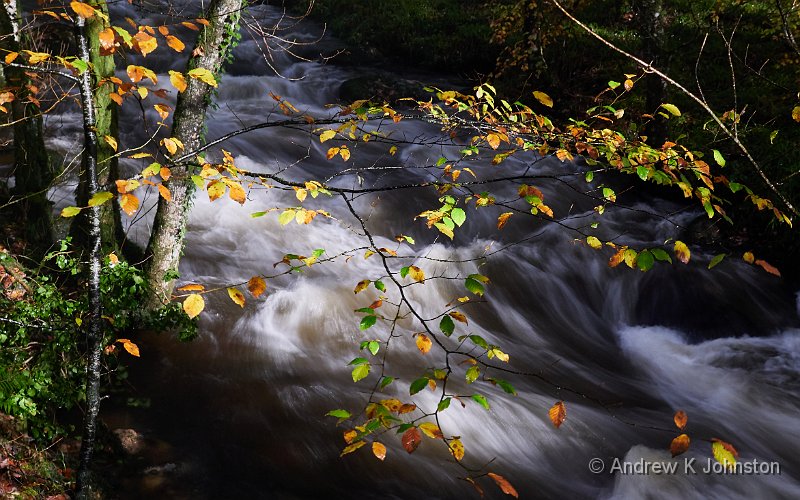
The usual multi-shot constraints apply, especially in respect of any moving elements. Where panorama and HDR software tend to be able to deal with “ghosts” (items which only appear in one frame, or move between frames), focus stacking software is less able to do so. Unless you’re a very steady photographer getting a suitable set of images may demand the use of a tripod, although I now get fairly reliable results hand-held with the Panasonic G9’s high-speed focus bracket mode.

The gold standard for focus stacking software is probably Helicon Focus, which works well with Capture One or similar for the initial image development.

3D

If you have the ability to display 3D images, such as a 3D TV, then this is a very rewarding type of multi-shot photography. To my annoyance I didn’t take any 3D photos on Dartmoor, I just wasn’t in that zone for some reason, but I have written about how I create 3D images at length here.

If you work with a single camera the usual constraints apply to moving elements. You can take these constraints away if you have two cameras with the same sensor and lens – simply mount them side by side with identical settings and trigger both simultaneously – but the single-camera method is probably easier.


Image Stacking

This is a technique I use less often, but there are valid cases for it. The idea is simply to take a number of “near identical” frames over a period of time (tripod and some form of automated shutter release required for this one!), and combine them. There are two very different objectives:

  • Removing moving objects from the scene. For example you can take a number of frames each of which has other people in it in different places, but combine them so the net image has none.
  • Combining the elements which have changed between the images. The best known application of this form is star trails, like here.

How you take and combine the frames will depend on your objectives for the overall image, and I’m not an expert, but when I have used this technique I’ve found plenty of guidance and solutions online.


Setting Up Your Camera

You can use just about any digital camera with a reasonable level of manual control for any of these techniques. Just make sure the exposure is under your manual control, and either consistent across the frames (for panoramas, focus stacking, 3D and image stacking) or varied in a predictable way (for HDR). However more recent cameras in the “advanced amateur or professional” class tend to have a number of features which make things very much easier. The Panasonic G9 is a good example.

It’s very much easier if you can program good default settings for each technique as a custom mode on your camera. On the G9 everything except the frame rate and auto/manual focus can be set in a custom mode, and, intelligently, Panasonic enable high frame rate when you select a bracketed mode, even if the switch is on “single shot”. Here’s how I set up my custom modes:

  • HDR

    • Aperture f/6.3
    • Auto-exposure bracketing 5 steps ± 2EV
    • ISO 200
    • Auto white balance
    • Auto exposure bracket burst mode (This enables the bracketed set to be taken quickly with one shutter depression, even if the camera is nominally in single-shot mode)
    • Standard AF & metering
    • 3:2 aspect ratio
  • Panoramas

    • Manual exposure: f/8, 1/60s (This is a starting point, the first action is to adjust it to fit the brightest part of the scene)
    • ISO 400
    • Daylight white balance
    • Level On
    • Single shot
    • Standard AF & metering
    • 4:3 aspect ratio
  • Focus Blending

    • Aperture priority: f/6.3
    • Auto ISO and white balance
    • Focus bracket mode: 5 step, 5 images, sequence 0/+ (This moves the focus from the point you select for the first image to infinity in 5 steps)
    • Low speed burst mode
    • Standard metering
    • Natural Picture Style (This is so that in my workflow I can quickly identify focus bracket sets and move them to a separate directory)
    • 4:3 aspect ratio
  • 3D

    • Aperture priority: f/7.1
    • Auto ISO and white balance
    • Single shot
    • Standard AF & metering
    • Scenery Picture Style (Again just to identify 3D pairs in my workflow)
    • 16:9 aspect ratio

If your camera doesn’t really support custom modes, and instead has explicit switches for everything, then it’s worth making a note of the starting point for each multi-shot mode rather than having to make it up as you go along. It will be a bit more work, but perfectly feasible.

Conclusions

“If you only have a hammer, everything looks like a nail.” While developing your mastery of “getting the shot in camera” is important, single-shot techniques won’t get every image, and it’s important to have other options. Specialist equipment, or the steadily increasing capabilities of phone cameras may come to the rescue, but a number of simple multi-shot techniques will work for almost any camera, anywhere, and provide you the raw material to create great images which might otherwise escape.

View featured image in Album
Posted in Photography, Thoughts on the World | Leave a comment

Last Light: A New Dawn?

Combestone Tor
Camera: Panasonic DC-G9 | Date: 04-11-2020 07:35 | Resolution: 5182 x 3239 | ISO: 640 | Exp. bias: -33/100 EV | Exp. Time: 1/60s | Aperture: 7.1 | Focal Length: 25.0mm | Location: Combestone Tor | State/Province: Holne, Devon, England | See map | Lens: LUMIX G VARIO 12-35/F2.8

We awoke on day 2 of the Dartmoor trip to a changed world at multiple levels: news from the US election of Trump’s likely demise, and much crisper, drier weather over Dartmoor. Lee decided to return to Combestone Tor for the pre-breakfast shoot, so we could see it literally in a different light, and it was scarcely credible as the same location. We had the sun rising clear in a pale orange sky, the valleys below the tor filled with frosty fields and wisps of fog, and glorious red light on the stones as the sunlight reached them. Almost too many things to point a camera at.

Combestone Tor (Show Details)

After breakfast we took a short drive, and slightly longer walk, to the Windy Post, an old cross next to a small weir which rewards a low viewpoint and long exposures.

Windy Post Granite Cross (Show Details)

After that it was back to the hotel, which was threatening to lock the doors and barrier the car park at 4pm, to form a long convoy for the next part of the journey, to Saddle Tor. At the top of the Tor we were delighted by having a beautiful Dartmoor pony pose for us in front of the stones, and lower down we got shots of the fascinating Holywell rocks. I ate my lunch behind the rocks, with almost no-one in view for miles around, yet all the car parks were absolutely packed, with a very large number of other people having the same idea of enjoying the last good day on Dartmoor before lockdown.

Saddle Tor, and a nice Dartmoor pony! (Show Details)

The day’s last location was Bowerman’s Nose, a great outcrop which really does resemble a head and shoulders bust. The drive out was really hairy, as by then dark had fallen and at one point I had to negotiate a stretch of road at least 100m long between stone banks closer together than the walls of my garage, which set both front sensors on the car tweeting continuously. Fortunately I got out without a scrape, and in another stroke of fortune Gurinder had discovered that the Travelodge on the M5 was still taking overnight bookings for the Wednesday night, so at least I could defer the long drive back home to a very pleasant Thursday morning. Mission accomplished.

Bowerman’s Nose (Show Details)
View featured image in Album
Posted in Photography, Thoughts on the World, Travel | Leave a comment

Last Light Before Lockdown

Brentor Church, and a rainbow!
Camera: Panasonic DC-G9 | Date: 03-11-2020 16:07 | Resolution: 11442 x 4169 | ISO: 400 | Exp. bias: 0 EV | Exp. Time: 1/60s | Aperture: 8.0 | Focal Length: 12.0mm | Location: Brentor Church | State/Province: Brentor, Devon, England | See map

After the cancellation of my Patagonia trip in March at a few days notice, and our short trip to France at 12 hours notice in July I was really hoping I could make my final attempt of the year work. The plan was to travel down on Monday 2nd, have two days photographing Dartmoor in Autumn under the expert guidance of Lee Frost, and drive back on Thursday 5th. It was therefore somewhat inevitable that on the Saturday Boris announced a national lockdown starting at midnight on the Wednesday!

Lee decided to go ahead with the course, although it became apparent that the plan to stay over Wednesday night in our hotel and travel back on the Thursday morning wasn’t going to work. For a while it looked like I’d be doing a 200 mile drive after dark on Wednesday evening, starting in the middle of Dartmoor, although fortunately we eventually found a better solution.

After an uneventful drive down, and a pleasant dinner with the others on Monday night, Tuesday dawned wet and blustery. We did manage a pre-breakfast shoot at Combestone Tor, but it wasn’t terribly edifying. The main thing I established was that my old Russian hat will keep the rain out for some time, as will my 20 year old microfibre jacket, but my new hi-tech down coat won’t! Soaked through, the latter item didn’t serve any useful purpose for the rest of the trip…

The River Webburn at Buckland Bridge
(Show Details)

After breakfast things lightened up a bit and we headed to Buckland Bridge, where the River Webburn joins the Dart. Both rivers were swollen and dramatic, there’s a beautiful old granite bridge, and there was still a lot of autumn colour in the overhanging foliage. The combination of fast-running water and still foliage demanded long exposures to slow the water’s movement, but I’d had a relatively long walk in from my parking space and had (maybe foolishly) opted not to bring my tripod! However the amazing dual image stabilisation of the Panasonic G9 and its lenses came to the rescue, and I discovered that with an ND filter on the front I could slow the exposure down to as much as 0.4s, but still get a sharp image hand-held. You judge the results.

The River Webburn at Buckland Bridge
(Show Details)

Over lunch we trekked over the moor to Nun’s Cross Farm, an abandoned farmhouse literally in the middle of nowhere. I don’t really do “dark and gloomy”, and to my mind the boarded-up building falls between two stools, neither pretty nor really ruined. It was cold, wet and muddy. Nul points! We did see the local hunt, out themselves beating the lockdown and, one suspects, some of the rules about hunting with hounds. It does have to be said that I have never seen so many mounted huntsmen be so polite and friendly, so full marks for the charm offensive.

View from Buckland Bridge
(Show Details)

We ended the day at Brentor Church, a beautiful 14th Century church with a commanding view of much of the moor. This is a great location, and I found a lot to shoot, although we were again fighting the weather. However the frequent squalls delivered an amazing sight, a full-arc rainbow (with a partial second arc), but sunlight on the church itself. Shot of the day.

View featured image in Album
Posted in Photography, Thoughts on the World, Travel | Leave a comment

Blast from the Past

Sugar Minott, Ken Boothe, John Holt, Eric Donaldson, Pluto and Boris Gardner at the Original Barbados Vintage Reggae Concert 2003
Camera: Canon PowerShot S40 | Date: 23-03-2003 06:28 | Resolution: 2192 x 1370 | ISO: 400 | Exp. bias: 0 EV | Exp. Time: 1/60s | Aperture: 4.9 | Focal Length: 21.3mm (~103.2mm)

With my friends Bob Kiss and John Birch both busy resurrecting old photographs with new software, I thought I would have a go. To give it a real challenge, I went back to my shots from the original 2003 Barbados Vintage Reggae Festival. These were taken indoors using a 4MP Canon S40, which had a maximum usable ISO of 400 (200 was a better bet), and because I didn’t know about such things back then, I captured only JPG, not RAW.

Boris Gardner at the Original Barbados Vintage Reggae Concert 2003 (Show Details)

However, Topaz Denoise AI has worked its magic, and I’m very pleased with these.

John Holt at the Original Barbados Vintage Reggae Concert 2003 (Show Details)

And yes, that is Sugar Minott, Ken Boothe, John Holt, Eric Donaldson, Pluto and Boris Gardner all onstage together at the end! The very best wishes to those still with us, and may those who have sadly departed this sphere rest happily, but hopefully not too quietly, in peace.

John Holt at the Original Barbados Vintage Reggae Concert 2003 (Show Details)
View featured image in Album
Posted in Barbados, Photography, Travel | Leave a comment

What’s My Favourite Micro 4/3 Lens?

Burmese girl on Lake Inle
Camera: Panasonic DMC-GX8 | Date: 17-02-2017 16:47 | Resolution: 3124 x 3124 | ISO: 320 | Exp. bias: 0 EV | Exp. Time: 1/500s | Aperture: 6.3 | Focal Length: 193.0mm | Location: Burmese girl on Lake Inle | State/Province: Ngapegyaung, Shan | See map | Lens: LUMIX G VARIO 100-300/F4.0-5.6

Over at The Online Photographer Mike Johnston posed a question about favourite Micro 4/3 lenses. The obvious answer is the 12-35mm f/2.8. I bought one several years ago largely off the back of Mike’s original review, it sits by default on my G9, and perhaps 90% of my photography by shot count uses it. As he said, it’s like having multiple high-quality primes in one small tube. By any practical definition, that’s my favourite.

I supplement it with the matching 35-100mm (same thing, just longer), the 100-300mm (capable of serious papp-ing, but also of some subtlety – see above, shot between two boats at 600mm-e),and sometimes the 7-14mm (although that gets very limited use given the 12-35mm is so good at 12mm). Together with the G9 that’s my “serious / obvious / heavy” kit. (Note that “heavy” is relative, the four zooms weigh a total of 1477g.)

However, maybe the 12-35mm is a lazy choice…

I also have a second kit, the “social / subtle / light” kit. This consists of the tiny Panasonic 14-42mm “pancake” power zoom, their 45-175mm, and the Olympus 9-18mm. Total weight 460g. These normally travel as spares with my old GX8, but get pressed into service when I need their remarkable physical characteristics. The 45-175mm is a real gem: only 90mm long (and no longer, it’s an internal zoom) and 210g, in adequate lighting it’s capable of shots just as sharp as the 35-100mm f/2.8. Its tiny size makes it unthreatening, its light weight makes it easy to hold the camera above your head (e.g. from the back of a crowd) and get sharp shots, even at maximum 350mm-e reach. However if you’re moving, it has another magic property: its size means that it can be held stable in the slipstream. Last year I was lucky enough to get a flight in a two-seat microlite, and here’s one of the shots I took from the back seat – try that with a 5D and EF100-400m lens!

Shot from the back of a two-seater microlite (Show Details)

Is the 45-175mm lens my favourite? I’m not quite sure, but how about it for a “left field” choice?

View featured image in Album
Posted in Micro Four Thirds, Photography | Leave a comment

Hungry Birds!

Blue tit babies
Camera: Panasonic DC-G9 | Date: 21-05-2020 11:08 | Resolution: 2094 x 2094 | ISO: 2000 | Exp. bias: -33/100 EV | Exp. Time: 1/500s | Aperture: 7.1 | Focal Length: 193.0mm | Lens: LUMIX G VARIO 100-300/F4.0-5.6II

Enormous excitement chez nous. We have a bird box, installed in the courtyard many years ago, which has been systematically ignored most years. But not this year. A couple of weeks ago we realised that a couple of blue tits were frequenting it, dragging bits and pieces of nest material back and forth, and in the last week activity had ramped up dramatically but we weren’t quite sure to what what stage.

Then yesterday while Frances was planting she heard some very enthusiastic tweeting, and caught sight of a couple of tiny yellow beaks. Mum and Dad are now running relays about 14 hours a day to shovel food into those tiny beaks. It’s quite interesting to watch the patterns. One, let’s assume it’s Dad, has obviously found a good source of grubs at the other end of the garden and does straight runs right through the Chinese circle, only slowing slightly before dumping said grub into a waiting beak. He was on about a 2 minute cycle yesterday afternoon.

Feeding time – all the time! (Show Details)

The other, let’s assume it’s Mum, is more cautious, and tends to land on a nearby branch or two first before approaching the box more slowly. Sometimes they arrive together and it’s amusing to watch one bouncing up and down waiting for the other to finish his/her delivery.

That looks tasty… (Show Details)

It was never a deliberate plan, but we have four windows with a view of the box, and they don’t seem to mind us standing watching or photographing as long as we’re behind glass. It’s a bit of a challenge photographically as they all move so quickly, and I haven’t yet got the perfect shot of a grub being deposited into a waiting yellow beak, but these aren’t bad. Enjoy!

That cobweb covered in pollen looks good, if I can just reach it… (Show Details)
View featured image in Album
Posted in Photography, Thoughts on the World | Leave a comment

Raising the Bar…

Obelixia - primary resident of Elizabeth Bay - my shot
Camera: Panasonic DC-G9 | Date: 25-11-2018 11:48 | Resolution: 5159 x 3224 | ISO: 200 | Exp. bias: -33/100 EV | Exp. Time: 1/200s | Aperture: 6.3 | Focal Length: 286.0mm | Location: Elizabeth Bay | State/Province: Elizabeth Bay, Karas | See map | Lens: LUMIX G VARIO 100-300/F4.0-5.6II

Assuming that we all get back to travelling, it looks like I have seriously raised the bar on my own travel photography. Not only did we get to shoot at one of the same locations as Seven Worlds, One Planet, but it looks like I got to photograph the same individual! (Spot the distinctive pattern of bites on her ears.)

From Seven Worlds, One Planet (Show Details)
View featured image in Album
Posted in Namibia Travel Blog, Photography, Travel | Leave a comment

Small is Beautiful

Miniature sarcophagus from the Tutankhamun exhibition
Camera: SONY DSC-RX100M4 | Date: 30-12-2019 12:54 | Resolution: 2832 x 4248 | ISO: 2000 | Exp. bias: -0.7 EV | Exp. Time: 1/80s | Aperture: 4.0 | Focal Length: 25.7mm (~70.0mm)

Here are a couple more of my shots from the Tutankhamun exhibition. The sarcophagus is a particular delight, as the full-sized items did not travel from Egypt, but this 6″ version did. In real life it’s tiny – if you look carefully you can see a pin to the left of the belt – that’s a normal mounting pin, not a bolt! So I have a picture of the sarcophagus, almost as if we’d seen the real thing.

I’m very pleased with this image. It was taken at f/4 and ISO 2000, through glass but from only about a foot away. Depth of field was a significant challenge, but I cheated slightly by putting the result through Topaz Sharpen AI in focus mode. The result is sharp in most areas, although the top of the headgear and tip of the beard are still slightly out. Noise wasn’t really a problem, although Topaz did clean it up slightly.

However this is mainly a testament to the Sony RX100, rather than post-processing. It may be the size of a packet of cigarettes, but it’s capable of images just as good as an interchangeable-lens camera ten times its size and weight. It’s not a “point and shoot” compact camera, it’s a big camera made small. However small doesn’t mean cheap, even this five year old variant costs over £500 if you find someone who still has new stock. The latest variant costs almost as much as a top-end Micro Four Thirds camera or mid-range DSLR.

Necklace featuring Akenaten, from the Tutankhamun exhibition (Show Details)

But that’s absolutely right. Making tiny things which are just as good as the full-sized versions is hard, takes a lot of work, and demands arguably even more skill. I would hope the Pharaoh’s advisors accepted that when they commissioned a jeweller and a miniature artist to make these items. It’s equally true today.

View featured image in Album
Posted in Photography, Thoughts on the World | Leave a comment

Wonderful Things

Statue of Tutankhamun
Camera: SONY DSC-RX100M4 | Date: 30-12-2019 12:42 | Resolution: 3194 x 4259 | ISO: 800 | Exp. bias: -0.7 EV | Exp. Time: 1/60s | Aperture: 4.0 | Focal Length: 19.9mm (~54.0mm)

Tutankhamun: Treasures of the Golden Pharaoh

Ahead of the opening of the new museum at Giza dedicated entirely to Tutankhamun, some of the treasures from his tomb have been doing a last "world tour", including London’s Saatchi Gallery. They will be there until 3rd May.

We visited the other day, and I simply have insufficient superlatives. "Blown away" maybe just covers it. It’s hard to credit that many of these beautiful statues, jewels and other grave goods are over three thousand years old.

Brooch from the "Treasures of the Golden Pharaoh" Exhibition (Show Details)

I would also like to say a big "thank you" to the exhibition’s organisers. The numbers were being managed perfectly – enough that a reasonable number of people get to see the treasures, but not so busy that there was any jostling or a problem if you wanted to study an item closely or take a photo. Buggies and large bags aren’t allowed, so that filters out two of the main causes of congestion. This also ensures that the children present are old enough to appreciate it, and I have to say it was a delight to see so many youngsters engaged with the exhibits, not just dashing from screen to screen.

Tutankhamun and admirer at the "Treasures of the Golden Pharaoh" Exhibition (Show Details)

The captions and explanations are displayed either above or below the exhibits, large enough to be read easily without constant manipulation of glasses. These include both practical explanations, and apposite quotes from The Book Of The Dead.

The exhibition is also, bar none, the most photography friendly one I have ever attended. There’s no restriction on taking images, and little on equipment although flash is banned and large kits discouraged under the "large bags" rule. Tripods are not explicitly banned, but similarly covered and I didn’t see anyone attempting to use one. However there’s no need for them as the exhibits are all well lit, with dark backgrounds and a clear attempt to avoid reflections, hotspots and distractions. I just used my diminutive Sony RX100 mk IV, but any medium-sized DSLR or mirrorless with 24-70mm zoom lens would be equally acceptable and successful.

I was very please with the results from the Sony. Most didn’t need any correction beyond what Capture One applies by default with maybe some highlight and shadow recovery. For most images I just cropped in on the artefact, knocked the background back to black, and removed any remnants of the surroundings, for a "pseudo catalogue" look. Alternatively you could leave it lighter and include a bit of context, like my photo of a young admirer above.

The ancient Egyptians believed that you only truly die when the last person speaks your name. If that’s right then Tutankhamun succeeded in his quest for eternal life beyond his wildest imaginings. If you get a chance, then go to the exhibition and speak his name too.

Statue of Horus from the "Treasures of the Golden Pharaoh" Exhibition (Show Details)
View featured image in Album
Posted in Photography, Thoughts on the World | Leave a comment

Hunting Coffee in Hana

From the beach outside the Hana Kai Lodge
Camera: Panasonic DC-G9 | Date: 27-09-2019 06:40 | Resolution: 3888 x 3888 | ISO: 400 | Exp. bias: -33/100 EV | Exp. Time: 1/160s | Aperture: 7.1 | Focal Length: 64.0mm | State/Province: Hana, Maui, Hawaii | See map | Lens: LUMIX G VARIO 35-100/F2.8

Day 6

I make a fairly early start and go down to the small beach to watch the sunrise. Just as the sun is getting established it starts raining, but the result is an amazing rainbow behind the hotel, and great light on the beach.

From the beach outside the Hana Kai Lodge
(Show Details)

This was planned as a rest day, so we have a gentle morning. After lunch we try the Museum and Cultural Centre, but it’s shut. Fortunately the Lava tubes are open, and absolutely fascinating. I learn a bit about the different types of lava, which seem to be most accurately described using Hawaiian and have fun trying to photograph the cave with camera in one hand and torch in the other.

Inside the Hana Lava Tubes
(Show Details)

Hana does seem to be a town without a coffee shop. We stop at the banana bread stall, but at 3.30 they have switched off their coffee machine and are not prepared to just sell us a slice of cake, only a whole one. Useless. Is this really America?

I have no idea why, but I don’t have much luck with sandals. Today for the third time in about as many years, both of my relatively new sandals decide to simultaneously self destruct, on this occasion with both soles completely detaching. The Hana local store sells me a pot of glue, which turns out to be a sort of foaming filler. The soles are now firmly attached, but with odd blobs of yellow filler poking out around the circumference. Frances not amused at the inelegance. Evo Stik added to holiday checklist.

Dinner is accompanied by an entertaining game of "do you know what it is yet?" Crowd pleaser standards, played on a Ukulele and sung in an impenetrable Hawaiian accent. 🙂

Inside the Hana Lava Tubes
(Show Details)
View featured image in Album
Posted in Hawaii Travel Blog, Photography, Travel | Leave a comment

Yes, Kit DOES Matter

That's more like it - hand-held at 1/3s
Camera: Panasonic DMC-GX8 | Date: 13-11-2015 15:44 | Resolution: 3888 x 5184 | ISO: 100 | Exp. bias: -66/100 EV | Exp. Time: 0.3125s | Aperture: 10.0 | Focal Length: 21.0mm | Location: Views of Rinpung Dzong from Pa C | State/Province: Paro | See map | Lens: LUMIX G VARIO 12-35/F2.8

Picasso had his blue period. I had a blurry period.

There’s a common line in much of photography writing. Set aside those actively trying to sell you something, and most will at some point claim that "kit doesn’t matter”. The idea is that a good photographer can get excellent results with any equipment. He or she will understand and work within any limitations, potentially even making an artistic feature of them. Conversely the mediocre photographer chasing improvement through better equipment is wasting time and money better spent on training in technique.

However that has not been my experience…

I’ve been a photographer since my teens. Until the mid 00s I muddled along with low-end 35mm film cameras and a variety of relatively cheap lenses, typically “kit” lenses or items purchased randomly from shop displays of used items. Over the years I’d worked up from a “manual everything” camera with fixed 50mm lens to an entry-level Canon EOS SLR which provided automatic focus, exposure and film winding. The photos had their limitations, but I lived with them. They were better than most friends and relatives managed with “point and shoot” cameras, but they didn’t really relate to the sharp, colourful large-format images I saw in magazines or at exhibitions.

That changed with the advent of my first DSLR, a Canon 350D. Now I had a tool capable of producing high-quality digital images, in theory up there with the best of them. OK, auto-focus was slow for anything but well-lit static subjects, and the maximum usable ISO was 800, but by using the histogram I could reliably get correctly exposed and focused shots almost every time, banishing most of the technical issues which had limited my film photography. At the same time I realised that because of the constraints of my work, photography, and travel for it, was really my main hobby, and I wanted to become good at it.

Score 1 for a kit upgrade, but I suspect we all overlook this one.

I knew I needed to improve my compositional skills and my eye for images, but I read widely, attended courses, got some mentoring, and practiced. I do say so myself, but my ability to see, frame up and capture an image improved steadily. I learned to shoot RAW, and started to develop an efficient toolkit to work through and develop my pictures. I took the better ones proudly to my mentor…

…At which point he made a comment about sharpness, and I realised that it was true, many of my images seemed a lot softer than they should. Ignoring those with motion blur (due to subject movement), depth of field limitations or environmental constraints (haze or low light), quite a lot of straightforward static shots seemed to lack “bite”. I tried fiddling with the processing, but to little avail. I wondered if the problem was camera shake, but that seemed unlikely as I have a steady hand, and I proved that I could get sharp shots with my telephoto at full stretch and a moderate shutter speed, and from my non-stabilised wide-angle lens. That should have told me something, but it didn’t.

At the time my main lens was the Canon EF-S 17-85mm f4-5.6 IS USM. This was a decent lens, neat, smooth in operation with good stabilisation, and received decent reviews. It did suffer quite bad chromatic aberration near its limits, but that was usually correctable. However I became convinced that simply because it was relatively cheap maybe it was the culprit.

So I set about trying to find a better mid-range Canon zoom. This proved easier said than done. Canon had multiple well-reviewed zooms which were 24mm at the wide end, but that’s only "wide" on full frame, and useless for my style of photography with APS-C bodies. I borrowed a 17-40mm lens, but that seemed heavy, lacked image stabilisation and didn’t seem to produce much better results than what I had. Ditto the 17-55mm, which is a good lens, but a big lump for what it is. At the same time these all equated to about 28mm at the wide end, and I was ideally hoping for something a bit wider. My options seemed limited.

At which point, Canon released the EF-S 15-85mm f3.5-5.6 IS USM lens. This looked like the answer to my prayers: similar range to the 17-85mm but a bit wider, marginally faster, and about twice the price, so it had to be better, didn’t it? I read reviews and tried one in a shop, all of which looked quite promising. I bit the bullet and purchased one.

Picasso had his blue period. This was the beginning of my blurry period.

I don’t mean that every shot I took was a fuzzy mess. In well-lit conditions straight on to a static subject with no vast challenge on depth of field the results were OK. Subject movement wasn’t a problem either – the lens played very well with the Canon 7D’s excellent autofocus on moving targets. However in terms of my images being a bit disappointing on the sharpness front, if anything the rate seemed to have gone up.


Nice colours, no shake, but still blurry

Some of this was down to my technique. I was arguably becoming too reliant on multi-purpose autofocus, and maybe not paying enough attention to depth of field complexities. Some was due to a straightforward mechanical weakness of the 15-85mm lens: pointed too far up or down the front element would move under its own weight and disturb zoom and focus, but I learned to recognise and manage that. However the fact remained that some images which should have been consistently sharp just weren’t.

Things came to a head on the first day of my Iceland trip, when I suddenly realised that only the autofocus lights in the bottom 2/3 of the viewfinder were active – the others never came on. The lens just wasn’t focusing properly on objects at the top of the image. I swapped to the 17-85mm lens and the problem went away, so that became my main lens for the remainder of the trip.

The 15-85mm lens was still under warranty, so it went back to Canon for repair. Actually it went back twice, as the first time it was returned "no fault found" and my carefully listed symptoms clearly ignored. The second time Canon reported that they had adjusted the front element of the lens. It was a bit better, but not right. I could point it straight at a wall, and either the top of the image would confirm focus or the bottom, but not both.

I went for a walk with friends, and took the shot below. It may not show up well at web resolutions, but it’s a very odd image. The roof tiles reflected in the water are sharp. The tiles photographed directly, without the challenges of reflection, but by definition at the same optical distance, are blurred.


The Canon 15-85mm lens’ failings uncovered

After that walk I did another review of the market, but was still unexcited by any other option. I sold the lens (for a fairly low price to a happy buyer, I checked), and bought another, brand new. It was a further step in the right direction, but I still couldn’t be sure that I was getting the images I should.

One problem is that it’s very difficult to understand the limitations of your kit if that’s all you have to compare. It’s a bit like trying to assess the benefits of Blu-Ray via an advert on a DVD – you only have a DVD quality image to judge. I call this the “can’t tell through current medium” problem. At the risk of channelling Donald Rumsfeld, you don’t know what you don’t know…

I was getting frustrated, and it shows in my portfolio. After the walk which generated the top image, the Canon 7D hardly contributed apart from sporting events, where coupled with the 70-300mm lens it continued to shine. Everything else was taken with other, supposedly "lesser" cameras.

When I bought the Panasonic GH2, I wasn’t intending to buy a "better" camera. I’d become attracted to the idea of mirrorless cameras, and I wanted a "full capability" camera kit which was genuinely small and light. In truth there was also a bit of gadget lust, partly bought on by my growing frustration with Canon, who were also very tardy in upgrading the 7D. Driven by the small/light mantra, I chose as my first micro four-thirds lens the 14-42mm "power zoom" (which folds itself down to a pancake when not in use), a lens which requires prodigious geometric correction in the camera or RAW convertor.

And the images it produced were so sharp, they just "popped" off the screen. Casual grab shots with the GH2 had a clarity of detail and colour I had rarely matched with the Canons, and only readily achieved with the excellent EF 70-300mm f/4-5.6 IS USM lens, rather than the mid-range zooms. I had found my reference!


My first real shot with the GH2 – sharp!

It’s surprising in hindsight, but even with this realisation, it was a long 18 months before I completely moved on. I was both personally and financially invested in the Canon system, and couldn’t change instantly. The GH2 was only 12MP (only 9MP at some aspect ratios). It struggled if the subject was actually moving, by comparison a great forte of the Canon 7D. In addition the early micro four-thirds cameras and lenses were tiny but felt fragile, and I was more disposed to expose the Canon kit to rain, dust or the sands of the Erg Chebbi. Underneath it all I suspect I was still somewhat in denial that a much cheaper, as well as smaller kit was capable of superior results.

The end of the transition came suddenly, via an accident which was happy for me, less so for my friend David. He was trying to shoot the swirling floodwaters of Winter 2013-14, knocked his tripod, and in went his 7D and lens. He wanted time to choose an upgrade replacement, so offered to buy my 7D as an interim solution. He also took a couple of lenses, but wasn’t interested in the 15-85mm. He’d obviously heard me swearing once too often!

The rest of my Canon kit went on eBay. Most sold quickly and for good prices. There was one exception: the execrable 15-85mm took months to sell and achieved a very low price. I was slightly chastened, but not really surprised.

Somewhat before the end I had mentally and practically moved fully into the Panasonic system. I loved much about it, especially the image quality, but also my kit finally included something which Canon had never been able to provide, a lightweight high quality mid-range zoom (the wonderful 12-35mm f/2.8, beloved even of lens snobs). My blurry period was over.

Now I’m sure there are plenty of people doing good work with APS-C Canon cameras, working carefully within the limits of the lenses, or living with their limitations. I could always have invested instead in a bunch of primes, or maybe I might have fared differently if I had got better results from my trial of the 17-55mm lens. However the reality is that I just couldn’t believe Canon would sell bad lenses for good money, and tried to "stick it out", rather than moving on sooner. For every photographer who is constantly chasing the next big thing, there’s probably one like me, constrained by the "I’ve bought it, so I must use it" mentality (or maybe just limited financial resources).

What moved me on wasn’t any clever analysis of reviews or lens performance charts. It was a few quid burning a hole in my pocket, frustration, a bit of gadget lust and a couple of inspiring Panasonic adverts. Effectively "Gear Acquisition Syndrome" saved my photography. I’m not sure to whom that should be a lesson, and I can imagine that this article may well not go down well with partners of dedicated gear nuts, but this is a true story, and you will never hear me say "kit doesn’t matter". I don’t agree.

View featured image in Album
Posted in Photography, Thoughts on the World | Leave a comment

Random? That’s a Coincidence…

A randomly selected image this morning - my old VW Eos
Camera: Panasonic DMC-GX7 | Date: 30-01-2015 17:00 | Resolution: 4894 x 3059 | ISO: 320 | Exp. bias: -66/100 EV | Exp. Time: 1/60s | Aperture: 5.0 | Focal Length: 17.0mm | Lens: LUMIX G VARIO PZ 14-42/F3.5-5.6

My programming project of the last few weeks has been to build my own “rolling portfolio”, which shows random images from my photographic portfolio as either a screensaver or a rolling display on a second monitor. I’ve implemented a number of features I’ve always wanted but never had from freeware/shareware options, like precise control over timing, the ability to quickly add a note if I see a required correction, and the ability to locate and review recent images if someone says “what was that picture you were just showing?”.

Having previous blogged about the poor quality of “random” algorithms in Android music player apps (see  How Hard Can It Possibly Be?), I decided to put my money where my mouth is, and write my own preferred random algorithm. This does a recursive, random walk down the selected folder tree, until it either finds an image file, or a dead end (and then tries again). This was refreshingly easy to implement, and as expected runs quickly without needing any prior indexing of the content.

Also as expected, the simplest implementation returned a disproportionate number of hits (and therefore a lot of repeats) from folders with a very small number of images, but that was easily fixed by adding a “weighting” at the second stage of the walk, to reduce the number of hits on smaller portfolios.

Job done? Maybe. I started to notice that I still see the same image selected twice in quick succession, and sometimes more than twice over a day or two. At first I thought this might be an issue with seeding the random number generator, so that I was re-generating the same random sequences, but a quick check confirmed that wasn’t the problem. The next most obvious possibility (to me!) was an issue with the Microsoft .Net random() function, so I added some logging to the app, recording each random number, and then fed a day’s worth through some frequency analysis in Excel. That got Microsoft off the hook with a clean bill of health: there’s a slight preponderance of zeros, which I can explain, but otherwise the spread of results looks fine.

At the same time, I also added logging for the selected images themselves. In yesterday’s work hours operation the screen saver showed 335 images, of which no fewer than 21 were duplicates. Given that I have over 3500 images in the portfolio, this seems very high, but maybe not.

This is a known problem in mathematics, a generalisation of the “birthday problem”. It’s so known, because a common formulation is the question “given a room of people, what is the probability that at least two have the same birthday?”. While you need at 367 people to guarantee a duplicate, the counter-intuitive result is that with just 23 people in the room, it’s more likely than not. The generalised equation for the solution is the following:

E = k – n + n(1 – 1/n)k

In this n is the number of items, k is the number of random selections, and E is the expected number of duplicates. Feed in k = 335 and n = 3500, and you get the outcome E = 16. That’s close enough to my observed value of 21 (this is all random, so any one measurement might be either side of the expected value, but the order of magnitude is right). Couple this with the way my mind works, looking for patterns, and I must therefore expect to see some repetition. However it’s clear that the algorithm is working fine, it’s just the normal workings of probability.

Another implication of this is that as the sample grows, some images will naturally appear several times, and others may not appear at all. If we take 3500 samples, the expected number of duplicates rises to over 1200, so over 1/3 of the images will still be unselected.

Do I fix this? The relatively simple resolution is to keep a list of selected images, and use that to discard any selections which are repeats during a given period. However I would rather run this without a data store and maybe, now I can explain it, I’m comfortable. Time will tell.

View featured image in Album
Posted in Code & Development, Photography, Thoughts on the World | Leave a comment