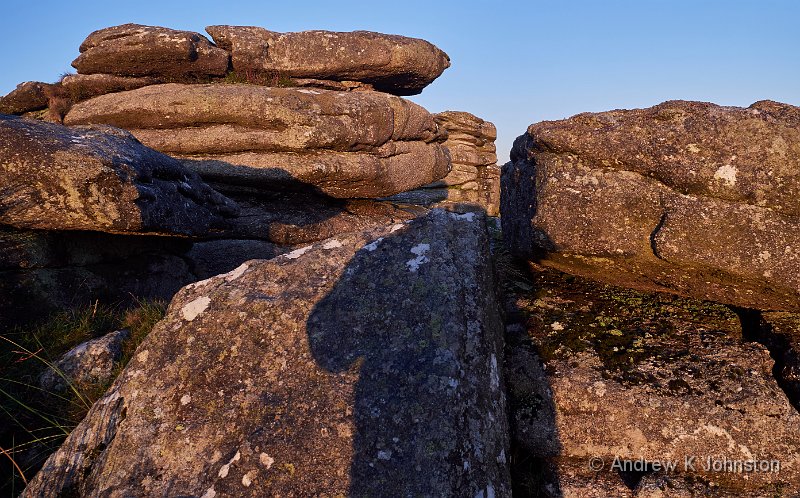
| Sunrise lighting the rocks at Combestone Tor. Panorama from 4 exposures | |
| Camera: Panasonic DC-G9 | Date: 04-11-2020 07:28 | Resolution: 13833 x 3717 | ISO: 400 | Exp. bias: 0 EV | Exp. Time: 1/50s | Aperture: 8.0 | Focal Length: 21.0mm | Location: Combestone Tor | State/Province: Holne, Devon, England | See map | |
When I first made the transition to digital photography, I got into several forms of multi-shot photography, techniques where you take two or more independent exposures and combine them to get a result not possible with a single frame. As cameras and processing have improved I have sometimes questioned whether these techniques are still required, but after a recent trip to Dartmoor I’ve come to the conclusion that they very much are, and they still suit my style of photography well.
All these images were taken in a single session at a single location: Combestone Tor.
Panoramas

| Combestone Tor: panorama from 4 images (Show Details) |
Let’s start with a non-controversial one. Sometimes a scene is wider than your lens, and the subject matter suits an image with an aspect ratio of 2:1 or more. The simple solution is to take multiple shots, rotating the camera between shots, and then join them together after processing. There are few workable alternatives for a high-quality image. You might get enough of the image into one frame with a really wide lens, but my widest lens is 14mm equivalent and I find that it is still not wide enough for a genuine panorama, plus it introduces a number of distortions which are not present in a good multi-shot panorama merging shots taken with a lens somewhere between 28mm and 50mm equivalent. You could use your phone in panorama mode, or a 360 degree camera like the Ricoh Theta, but that’s a compromise on quality. You could go the whole hog and get a dedicated panoramic camera like the Hasselblad XPan, but that’s an expensive film-based option, and means carrying a large piece of “single purpose” kit. None of this is necessary if you have a DSLR or mirrorless camera, or even a point and shoot as long as it has manual exposure control.
There’s a bit of technique required. Firstly you have to either select a scene with little/no movement, or you have to choose a shutter speed and shooting strategy so that moving objects are either blurred consistently (e.g. moving water) or excluded from the overlaps between images (e.g. people). You have to select a manual, fixed exposure and white balance which will work across the image, so check that it won’t be over-exposed at the brightest point, or too far underexposed at the darkest. The exposures need to be made in a controlled sequence (e.g. left to right), making sure that they have sufficient overlap, are level, and have some room to crop at the top and bottom beyond the desired subject matter. All of this is easy using an “advanced amateur” camera like the Panasonic G9 which has a level and shooting guides built into the EVF display, but benefits from practice. If the subject is all at least 3m away there’s no need to worry too much about “rotating around the optical centre” and you can just either twist your body (if working handheld) or rotate the camera on top of the tripod. (Both the panoramas in this article were taken handheld.)
If you do want to include much closer elements then you need to counter the effects of parallax (near objects moving relative to the background between frames). As always there are all sorts of complex, over-the top “perfect” solutions, but I’ve found a very simple yet reliable one: I have a plate about 6” long with a tripod screw hole at one end, and a slot with a 1/4” screw (the same size as a standard tripod fixing) at the other. I mount the camera with the tripod attached to the plate’s screw hole, and the camera attached to the other end of the plate so that the front lens element is positioned roughly over the centre of the tripod. Rotate the tripod head and the camera rotates around its optical centre. This approximate method is good enough to eliminate parallax issues in all but the most extreme cases.
There are a number of options for processing the images. I process the RAW files in Capture One, making sure I apply the same exposure and colour corrections to all frames, and also ensuring that the images are not cropped at all at this stage (Capture One’s Copy and Apply Adjustments functions work perfectly for this). I then drop the developed JPEG files into Autopano Giga to create the finished panoramas. Autopano does a pretty good job of automating most steps, but you have full control including a range of different projections for the panorama if needed.
HDR

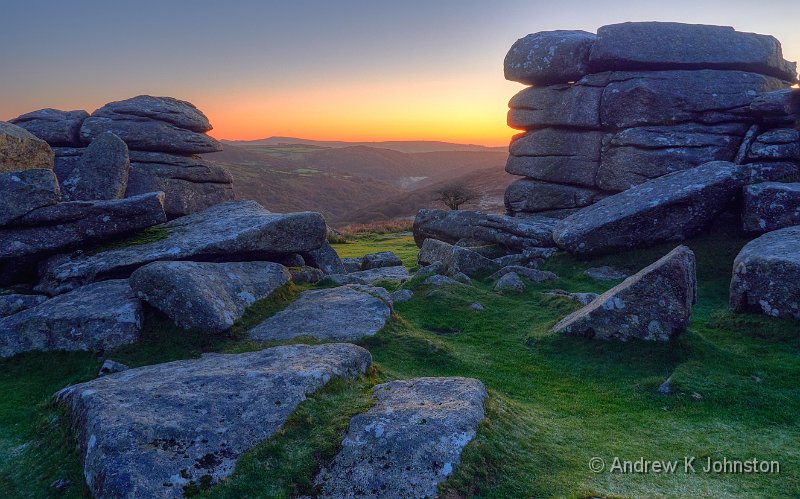
| Sunrise over Coomestone Tor (Show Details) |
There seem to be four schools of thought regarding multi-shot HDR…
“You can get any shot using ND grad filters if you know how to use them properly”. This is complete rubbish. Now I have no desire to diss generations of hard-working landscape photographers who have done their best with the available tools, and there are many great photographs taken with ND grad filters which I truly admire. However the reality is that this is a painstaking, static method and unless there’s a pretty straight horizon between the areas of different lighting there are going to be major compromises. Look for mountains with the top much darker than the bottom, or trees and rocks arranged against others when breaking the horizon would be a much more dramatic composition.
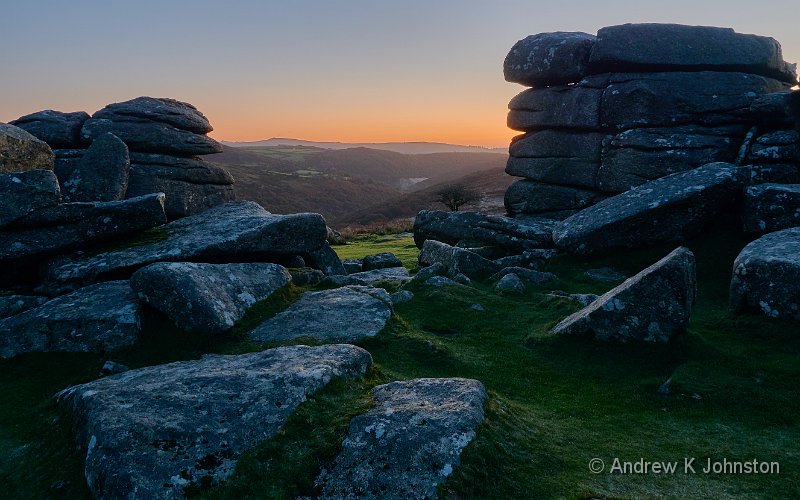
“With modern cameras and processing there’s no longer any need for HDR”. This is partially true. With the increased dynamic range of modern sensors, and better highlight and shadow recovery, you may be able to get much of the same result from a single frame. The following is my attempt to re-create the image above but from a single original. There’s a trade-off: the single image version is likely to be sharper and look more “natural”, the HDR version may be more dramatic. There are also hard limits: no single image will capture a dark interior with a well-lit scene outside the window.

| Sunrise over Combestone Tor. Single exposure version. (Show Details) |
“If you can’t get an image using the first two methods it’s not worth taking.” Pure, unadulterated snobbery. There’s a closely related version “I like to get things in one shot rather than messing around on the computer”. By all means choose not to take such an image, but accept that doing so is a limitation of your technique, and may disbar you from getting a great image.
“HDR still has a role to play, but needs to be used carefully and appropriately”. Absolutely correct. With a modern camera and processing software it’s an easily-accessible tool which you can use when it’s useful to do so. If you have a way to set up your camera to take a high speed exposure bracketed sequence you have the best of both worlds – develop a single frame, or use several for HDR, or both, and make the choice at your leisure after the shoot.
Like any multi-shot technique you need to pay attention to any moving elements, and you also need to check the shutter speed on the slowest frames. I can usually take HDR brackets hand-held, but the slowest frame for the image above was 1s, and I did need my tripod!
There are numerous options for developing such images. My solution is to develop the RAW files in Capture One, applying any desired crop and with the option to further tweak the exposure per frame if required, and then combine the JPEGs in Photomatix Pro.
Focus Stacking

| Detail in depth: focus blend from 6 exposures (Show Details) |
Just as a single image may not be able to capture the breadth of a scene, it may not be able to capture it’s depth, at least not all in focus. To get a close-up object and those further away all sharply focused then you have to use a smaller aperture, but you may hit the limits of your equipment, or simple physics. The effects of diffraction become noticeable above about f/6.5 for a 20MP micro-four thirds camera, and above about f/8 for a 50MP full-frame camera.
At this point you can choose to ignore the softness of the more distant elements, you can increase the f-number further and accept some loss of overall sharpness, or you can use a larger aperture and throw the more distant elements deliberately out of focus. These are all valid artistic choices, but they are work-arounds, not resolutions.
However if you’re in an environment which supports multi-shot photography there’s a further option: take a set of images bracketed at different focal distances, and use focus stacking software to combine them.
The usual multi-shot constraints apply, especially in respect of any moving elements. Where panorama and HDR software tend to be able to deal with “ghosts” (items which only appear in one frame, or move between frames), focus stacking software is less able to do so. Unless you’re a very steady photographer getting a suitable set of images may demand the use of a tripod, although I now get fairly reliable results hand-held with the Panasonic G9’s high-speed focus bracket mode.
The gold standard for focus stacking software is probably Helicon Focus, which works well with Capture One or similar for the initial image development.
3D
If you have the ability to display 3D images, such as a 3D TV, then this is a very rewarding type of multi-shot photography. To my annoyance I didn’t take any 3D photos on Dartmoor, I just wasn’t in that zone for some reason, but I have written about how I create 3D images at length here.
If you work with a single camera the usual constraints apply to moving elements. You can take these constraints away if you have two cameras with the same sensor and lens – simply mount them side by side with identical settings and trigger both simultaneously – but the single-camera method is probably easier.
Image Stacking
This is a technique I use less often, but there are valid cases for it. The idea is simply to take a number of “near identical” frames over a period of time (tripod and some form of automated shutter release required for this one!), and combine them. There are two very different objectives:
- Removing moving objects from the scene. For example you can take a number of frames each of which has other people in it in different places, but combine them so the net image has none.
- Combining the elements which have changed between the images. The best known application of this form is star trails, like here.
How you take and combine the frames will depend on your objectives for the overall image, and I’m not an expert, but when I have used this technique I’ve found plenty of guidance and solutions online.
Setting Up Your Camera
You can use just about any digital camera with a reasonable level of manual control for any of these techniques. Just make sure the exposure is under your manual control, and either consistent across the frames (for panoramas, focus stacking, 3D and image stacking) or varied in a predictable way (for HDR). However more recent cameras in the “advanced amateur or professional” class tend to have a number of features which make things very much easier. The Panasonic G9 is a good example.
It’s very much easier if you can program good default settings for each technique as a custom mode on your camera. On the G9 everything except the frame rate and auto/manual focus can be set in a custom mode, and, intelligently, Panasonic enable high frame rate when you select a bracketed mode, even if the switch is on “single shot”. Here’s how I set up my custom modes:
-
HDR
- Aperture f/6.3
- Auto-exposure bracketing 5 steps ± 2EV
- ISO 200
- Auto white balance
- Auto exposure bracket burst mode (This enables the bracketed set to be taken quickly with one shutter depression, even if the camera is nominally in single-shot mode)
- Standard AF & metering
- 3:2 aspect ratio
-
Panoramas
- Manual exposure: f/8, 1/60s (This is a starting point, the first action is to adjust it to fit the brightest part of the scene)
- ISO 400
- Daylight white balance
- Level On
- Single shot
- Standard AF & metering
- 4:3 aspect ratio
-
Focus Blending
- Aperture priority: f/6.3
- Auto ISO and white balance
- Focus bracket mode: 5 step, 5 images, sequence 0/+ (This moves the focus from the point you select for the first image to infinity in 5 steps)
- Low speed burst mode
- Standard metering
- Natural Picture Style (This is so that in my workflow I can quickly identify focus bracket sets and move them to a separate directory)
- 4:3 aspect ratio
-
3D
- Aperture priority: f/7.1
- Auto ISO and white balance
- Single shot
- Standard AF & metering
- Scenery Picture Style (Again just to identify 3D pairs in my workflow)
- 16:9 aspect ratio
If your camera doesn’t really support custom modes, and instead has explicit switches for everything, then it’s worth making a note of the starting point for each multi-shot mode rather than having to make it up as you go along. It will be a bit more work, but perfectly feasible.
Conclusions
“If you only have a hammer, everything looks like a nail.” While developing your mastery of “getting the shot in camera” is important, single-shot techniques won’t get every image, and it’s important to have other options. Specialist equipment, or the steadily increasing capabilities of phone cameras may come to the rescue, but a number of simple multi-shot techniques will work for almost any camera, anywhere, and provide you the raw material to create great images which might otherwise escape.
 Thoughts on the World (Main Feed)
 Main feed (direct XML)