Category Archives: Photography

Cuba Portfolio Now Online

Tobacco farmer, Vinales
Camera: Canon EOS 7D | Date: 18-11-2010 16:14 | ISO: 200 | Exp. Time: 1/250s | Aperture: 5.6 | Focal Length: 260.0mm (~421.2mm)

I’ve finally managed to publish my photography portfolio from Cuba. Take a look and let me know what you think…

Apologies if you use the RSS feed for my album – this will be fixed in a day or two.

Read the full articleView featured image in Album
Posted in Cuba Travel Blog, Photography, Travel | Leave a comment

That Shouldn’t Have Worked…

Mountain stream at Graenfjall, Iceland
Camera: Canon EOS 7D | Lens: EF-S17-85mm f/4-5.6 IS USM | Date: 26-08-2011 16:21 | ISO: 100 | Exp. bias: 0 EV | Exp. Time: 1/5s | Aperture: 14.0 | Focal Length: 26.0mm (~42.1mm) | Location: Grænafjall | State/Province: South | See map | Lens: Canon EF-S 17-85mm f4-5.6 IS USM

There’s a lovely moment in the film Sahara where Pitt and Giordano are following a typically desperate plan in the hope that if they can kill the villain his men will just surrender and lay down their arms. When, to their surprise, this starts to happen they look at each other and say simultaneously “That shouldn’t have worked…”. This is the photographic equivalent.

There are two schools of thought on how you should photograph moving water. One approach is to use a fast shutter speed and “freeze” the motion. I’m convinced that this is the best approach for large waterfalls, fast rivers or large waves, and you’ll see it in many of my photographs. As long as there’s enough light then there’s no major technical challenge with that approach.

The opposing school of thought is that you use a very slow shutter speed (typically a large fraction of 1s) and show the water as a blur. This expresses the direction of motion, but personally I don’t think it expresses the force or the dynamics so well. However, as Iceland has almost as many waterfalls as Venice has gondolas (see “Waterfalls, Waterfalls…”) I decided that this was an ideal opportunity to experiment.

I’ve come to the conclusion that the slow shutter speed approach does work, but it works best for small features with complex flow patterns, but relatively low flow speed/force. I’ve also reached the conclusion that a lazy man will work harder to avoid work than to actually do the job! 🙂

Here’s the official, recommended method to get a shot like the above:

  1. Pre-visualise the result you want, ideally using a cardboard rectangle instead of actually looking through your camera’s viewfinder.
  2. Set up your tripod. The heavier this is the better. If the waterfall is a long way from the road be grateful for the exercise. 🙂
  3. Curse when you realise that to position the tripod correctly either it, or you, are going to get very wet.
  4. Turn off image stabilisation, and mount your camera on the tripod. Attach the remote release.
  5. Fine tune the camera and tripod position to get the composition right. Curse when more of your kit gets wet.
  6. Set the exposure to get a shutter speed of 1/4 to 1s. Start by selecting the lowest ISO and a small aperture (say f22). If this isn’t enough, attach a polariser. If this is still not enough, take out the Lee/Cokin filter kit, mount up the filter holder, and slide in your neutral density filter(s).
  7. Meter carefully. Typically the highlights will be very bright if there’s any direct sunlight, and automatic metering may either over-expose or under-expose depending on how much of the scene is bright water relative to the rest.
  8. Take the shot.

In fairness, this method works well, even if your photography costs $10 a shot and you don’t see the results until six weeks after leaving the location. However, here is the alternative Andrew Johnston Patent Digital Method:

  1. Wander over to the interesting waterfall, and decide that this is one you want to photograph with blurred movement.
  2. Realise that it’s a long walk back to the jeep, and you can’t be ****d to get your tripod. Anyway, where you want to stand it would only get wet…
  3. Set your camera to its lowest ISO, aperture priority and a high aperture. On an APS-C DSLR you probably don’t want to go much higher than f16 as diffraction effects start to kick in.
  4. Make sure image stabilisation is on. If you want to control reflections and highlights attach a polariser and get it set right.
  5. Take a quick shot to check exposure. Dial in exposure compensation as required.
  6. If the resulting shutter speed is in the region of 1/10s – 1/4s you’re probably OK. If it’s too low, just reduce the aperture. If it’s still too high, take the ND filter out of the filter pack.
  7. Realise that the Cokin filter holder is in your other camera bag, which is in the jeep. See point 2. So don’t worry about the holder.
  8. Hold your camera firmly in your right hand. Hold the filter in the left hand, in front of the lens.
  9. Fine tune the composition, breathe in, and take the shot. Check the sharpness of the static elements on the LCD. If they are sharp enough then you’re done, if not go to step 8 and try again.

OK, if I’d had my Cokin filter holder in my bag I would have screwed it onto the front of the lens, which would at least have allowed me to brace my camera with both hands. What’s interesting is that Image Stabilisation technology is good enough that you can get decent hand-held shots at this shutter speed, and immediate digital review allows you to check their sharpness.

Next week – how to induce temporary paralysis so you can hand-hold for 25s for fireworks!

View featured image in Album
Posted in Iceland Travel Blog, Photography | Leave a comment

Iceland Photography Tips – A Spare Everything!

"Steamed" - action shot of the author, by James Chambers
Resolution: 531 x 397

Iceland is a great place for photography, but you need to be properly prepared to get the best of it, and not come away disappointed.

First, unless you’re very good at research, navigation and off-road driving, you need a guide. Sure, you can get to the well-known sites a short drive from Reykjavik or along the coast road under your own steam, but you’ll miss many of the most stunning locations in the interior. However, if you want to spend serious time on your photography you need to be with a group, and guides, who understand your needs. I can’t praise highly enough the great service I had from first contact with Nature Explorer. Hawk and Finn are both great company, skilful drivers, knowledgeable and entertaining guides, and impressive photographers in their own right. Their administrative staff are also excellent, and their resilience to problems comforting. I’m very happy to recommend them.

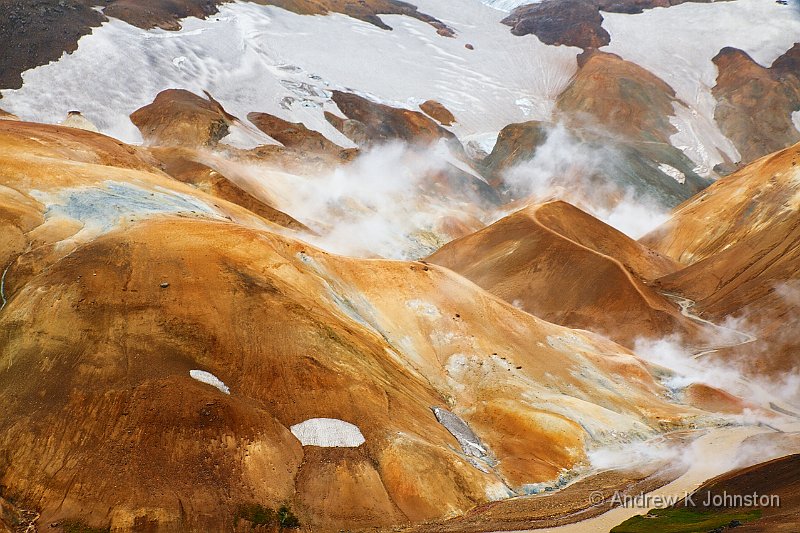
Next, dump your preconceptions. Even short distances or intervals bring dramatic variation in scenery, weather and lighting. Well known sites may be quite crowded, or almost empty. A classic view may disappoint, and then half an hour later a less obvious subject may be portfolio material. Dedicated dawn-watchers may disagree, but in my view timing isn’t critical – “golden hour” extends well into the morning and from late afternoon, but more importantly the quality of your light is much more likely to be controlled by the weather than the hour. Iceland rewards being prepared more than missing breakfast and supper.

Protect your kit well, and carry spares for everything! Iceland is a harsh environment. You’ll be doing long distances on rough roads. The volcanic dust and ash gets everywhere, and is very abrasive. You will end up soaked by rain, waterfalls and geysirs (in my case, “all of the above”;)). The failure of my 15-85mm lens wasn’t the only hardware problem in our group, although the others were mainly more minor problems with things like batteries, filters, lens caps and retaining rings. Several cameras gained battle scars from knocks and falls. I also managed to destroy a pair of trousers and gave up on a faulty battery. Nature Explorer even had to resort to a spare super-jeep!

As a minimum, make sure you have a second camera body and a second “standard” lens (whatever that means for you). My cheaper Canon 17-85mm lens rescued my trip. Consider carrying three batteries for your main body in case one dies as happened to me. Also remember one of the hidden advantages of using mid-range Canon kit – someone else in the group may be able to help. You will end up shooting in wet or dusty conditions, so a Kata Rain Bag or similar, and cheap filters you don’t mind wiping with anything to hand are both essential!

Iceland is cold, but it’s not the temperature that gets you (for our trip it was consistently above freezing and up to 14C), it’s the wind. The answer is lots of layers. For me the combination of sweatshirt, microfibre jacket with detachable lining, warm hat and raincoat with hood was about right, but others might need even more. I can also recommend carrying a flask of coffee. I ended up buying one on the first day, and leaving it behind, and had to haggle with hoteliers a couple of times about filling it, but it was well worth the effort.

Deep pockets are useful in two different ways. In a practical sense they are a great solution to the ridiculous baggage limits airlines are progressively imposing. If you can shove a couple of lenses into your trousers and heavy batteries into your jacket then the baggage allowances become less of a problem.

In the metaphorical sense you need to be prepared for high prices – Iceland isn’t cheap, especially by the standards of say the USA or southern Europe. That said, by UK standards and given the current exchange rate it didn’t feel that bad. I will comment on the recommendation made by almost every web site and guide book to buy lots of booze at the incoming duty free store. I’m now convinced this is a con trick to get free beer for Icelanders. Unless you’re a real alky, don’t bother.

Don’t expect to get anything done on the go. I had visions of sitting in the jeeps reading, writing my blog on my iPad, or at least preparing for the next location, but despite Finn being a very smooth driver this was absolutely impossible – the roads are just too rough. Not for nothing does my map of Iceland have a road classification I have never seen before: “main road – unsurfaced”. 🙂

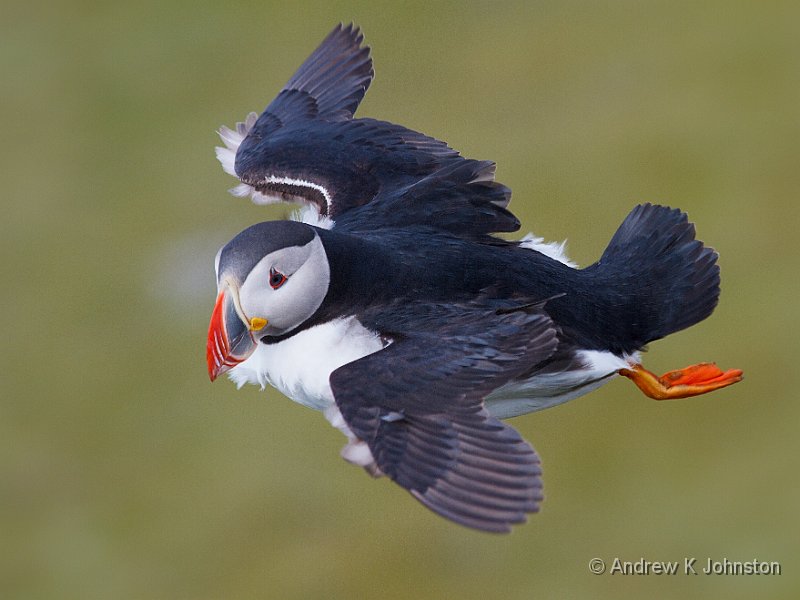
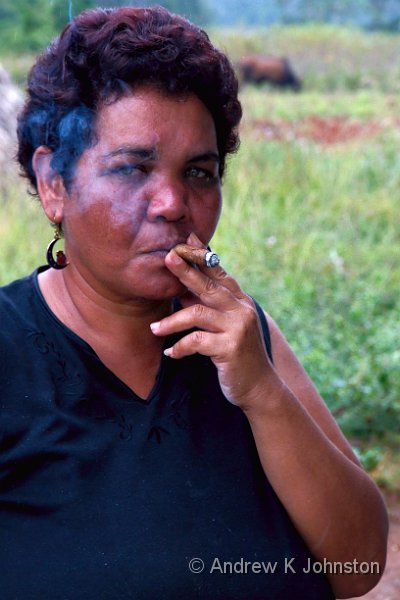
Be prepared for all photographic opportunities, and for lots of shooting. Although my Canon 7D got most use, the 550D also came into its own for wandering around Reykjavik, and I always had the S95 in my pocket for the unexpected. I shot at every focal length from 10mm to 300mm, and at every speed from 25s for the fireworks to 8 fps for the puffins in flight. I photographed landscapes, buildings, people and action. By the end of the trip I had exceeded my Cuba shooting total, having exposed around 2100 frames, with ~1150 (~30GB) retained for further processing after initial filtering. I used about 56GB of CF cards, plus a small amount on 2 8GB SD cards for the two smaller cameras.

There’s a saying “chance favours the prepared mind”. If that’s ever true, it’s true of photographing Iceland.

If you want to see more of my Iceland photography blog, or get a few specific location ideas, please go to www.andrewj.com/blog/iceland

View featured image in Album
Posted in Iceland Travel Blog, Photography, Travel | Leave a comment

Shoot Only Puffins, Leave Only Footprints

Puffin in flight at Dyrholaey, Iceland
Camera: Canon EOS 7D | Lens: EF70-300mm f/4-5.6 IS USM | Date: 28-08-2011 13:15 | ISO: 200 | Exp. bias: 0 EV | Exp. Time: 1/320s | Aperture: 6.3 | Focal Length: 180.0mm (~291.6mm) | Location: Reynisdalur | State/Province: South | See map | Lens: Canon EF 70-300mm f/4-5.6 IS USM

I was ready for a quiet day of mainly driving on Sunday. I was also ready to report a total of about 1800 shots taken, which is a bit lower than for the Cuba trip, not unreasonable given the slightly shorter duration and the fact that this was mainly landscape photography.

Then we got to the puffin colony… 🙂

Having visited a couple of interesting rock formations (basically basalt columns like Staffa or The Giant’s Causeway), we drove a short distance to the top of the cliff, which was essentially home to thousands of puffins, which were variously sitting quietly or diving off into the sea to catch food. They seem to be quite unafraid of humans, and because of the prevailing wind onto the cliff they had to glide slowly at take-off and landing, sometimes very close to us, which made photography feasible, if still challenging.

Of course, this is what my kit, consisting of the Canon 7D and 70-300 IS lens, is built for. Any minor inferiority complex relative to the 5D and medium format brigade vanished in the face of my 8 frames per second and high performance auto-focus, and I got a number of good shots. The above is probably one of the best, although there are several other good candidates.

It did put the shooting total up a bit. In less than an hour I took well over 300 shots, filling a 16GB memory card and flattening a battery, but who cares. Together with the other shots from the day the total now stands over 2150 – even higher than Cuba!

Our hosts had organised a wonderful end to the day. In the outskirts of Reykjavik we diverted to the hospital where Gruni (Finn’s wife, who had joined us on the tour) works. There we were doubly treated, both to a celebratory glass of champagne and a couple of chocolates, but also to an exhibition of the best of Finn’s photographs, in wonderful large prints. Definitely something to aspire to.

I’m back in the hotel, and busy packing for an early start. I’ll do a final post when I’m home, summing up and listing my tips for any future travellers, but it’s been a wonderful trip and highly recommended to anyone else who wants to try.

View featured image in Album
Posted in Iceland Travel Blog, Photography, Travel | Leave a comment

A Day of Travails

Fire meets ice at Kerlingfjoll, Iceland
Camera: Canon EOS 7D | Lens: EF-S15-85mm f/3.5-5.6 IS USM | Date: 22-08-2011 12:59 | ISO: 100 | Exp. bias: 2/3 EV | Exp. Time: 1/80s | Aperture: 10.0 | Focal Length: 31.0mm (~50.2mm) | Location: Blákvísl | State/Province: South | See map | Lens: Canon EF-S 15-85mm f3.5-5.6 IS USM

You don’t realise quite how empty the interior of Iceland is, or just how much time you’re going to spend bouncing over unmade roads through deserts of rock and mud. It’s not surprising that NASA test their extra-terrestrial rovers here. Fortunately the scenery when you get to each location more than makes up for it.

We started Monday by driving up to Kerlingfjoll (which roughly translates as “Bitch Mountain” :)). This is an amazingly colourful geothermal centre reminiscent of The Artists’ Palette in Death Valley, only with ice, rain, snow and steam all mixed in! The only problem was that it was blowing a gale, tipping with rain and only just above freezing. I braved it with my new raincoat, Kata rainbag and cheap filter on the camera, and got some great shots. One of the rest of the party had a little Canon in a waterproof housing (like I use for snorkelling) which was maybe slightly OTT but worked well, and her husband had a rainbag like mine, but everyone else gave up on photography which was an enormous pity.

After lunch we travelled up to Hveravellir (“Hot Field”), to see another geothermal display, this time a mix of hot pools and small geysirs. On the way back we diverted up to the Langjokull glacier, at a point where the jeeps could actually drive up onto it. This was a brilliant experience.

Unfortunately at this point I realised that my main 15-85mm lens was starting to play up, and my photos from the glacier aren’t that great. I don’t know whether it’s the vibration, the moisture or just a fault which was waiting to happen, but I’m getting a nice soft focus at the top/left of the picture, whether I want it or not :(. Fortunately I also have the 17-85mm as a spare, so hopefully this won’t put too much of a dent in proceedings. Yesterday also saw the possible demise of one of the batteries for the 7D, but I won’t know until I’ve recharged and re-tested it.

I’m going to start building up a list of tips for a trip such as this, but a spare everything, a rain bag and a cheap filter you don’t mind wiping with anything to hand are all essential!

Hotel Geysir may look nice, and dinner was great, but the rooms are a bit chilly and there’s really nowhere to type on the PC, so I’ll stop here… More tomorrow.

View featured image in Album
Posted in Iceland Travel Blog, Photography, Travel | Leave a comment

Don’t Rush to Judgement

Worker at tobacco farm, Vinales Valley, Cuba
Camera: Canon EOS 7D | Lens: EF-S15-85mm f/3.5-5.6 IS USM | Date: 18-11-2010 15:52 | ISO: 800 | Exp. bias: -1 EV | Exp. Time: 1/250s | Aperture: 9.0 | Focal Length: 76.0mm (~123.1mm) | Lens: Canon EF-S 15-85mm f3.5-5.6 IS USM

As soon as I’ve downloaded a shoot from my cameras, I do a quick scan of the in-camera JPEG files, and usually mark about half of the images for deletion. Those which are irrecoverable go straight to the wastebasket, the rest go into an “others” file from which they will only be retrieved in exceptional circumstances.

When I first reviewed my day’s shooting from around Vinales, I nearly gave this shot that treatment. It’s not the clearest portrait I’ve ever done, and the low-contrast of the original meant it didn’t look worth much effort.

However something made me keep it in the “to process” group, and I’m glad I did. The trick was a small crop, and a simple curves adjustment to make the smoke almost white against the woman’s face. The increased contrast makes all the difference.

I’m a great believer in getting shots almost right in camera, when I can. However sometimes the image is hidden for want of a few simple adjustments, as it was in this case. It’s a salutary lesson to me to not be too harsh with my initial filtering.


Iceland beckons, and I’m going to repeat the Cuba experiment and try and publish a daily photo blog of my trip. Expect to hear from me again later this week.

View featured image in Album
Posted in Cuba Travel Blog, Photography, Travel | Leave a comment

Seeing in Black and White – Follow Up

From the Ministry of Odd Coincidences…

This evening I watched this week’s Horizon, which, by remarkable assonance with my blog, was on the topic of the perception of colour. The programme made it clear that colour perception varies widely and subject to personal and contextual forces. However, given my post this morning, I was most interested in the fact that colour perception is strongly linked to the vocabulary you have to describe colours and their differences. The Namibian tribe who have words to describe slightly different shades of green, but who lump blues and greens together under a single word, can see the former, but not a blue/green variation.

Now I’ve always had a very good physical ability to remember and match or discriminate colours, but when I first met my wife I couldn’t articulate this. To exploit my colour vision in conversations with her (such as answering “do you think this will match X?” :)) I learned a more powerful vocabulary, and in turn further developed my colour visualisation skills.

When I took up photography seriously a few years ago I became aware of the colour of light, but again really got on top if it when I learned appropriate vocabulary to describe lighting causes and effects.

So maybe my visualisation skills relate to my ability to describe (even internally) what I see or the resultant image I want. I can do this in colour because I have developed an effective colour vocabulary. I don’t “see” in monochrome because I don’t mentally describe scenes using monochrome terms, unless I’m forced to because it’s all shades of grey, or just a single colour.

The great photographers of the early twentieth century developed the vocabulary I need. Ansel Adams’ Zone System was designed for exactly this purpose, and in his writing, such as Examples he actively describes scenes using the zone terminology. I understand the theoretical concepts, but I haven’t developed the habit of using them as linguistic tools to describe a scene. Clearly I could train myself to do so, but I don’t want to lose my skill with colours as a result. The interesting challenge is whether I can become visually bilingual.

Location:Bookham Rd,,United Kingdom

Posted in Photography | Leave a comment

Seeing in Black and White

Garden at Sissinghurst Castle, Kent
Camera: Canon EOS 550D | Lens: EF-S17-85mm f/4-5.6 IS USM | Date: 07-08-2011 14:11 | ISO: 200 | Exp. bias: 0 EV | Exp. Time: 1/50s | Aperture: 8.0 | Focal Length: 22.0mm (~35.6mm) | Location: Rolvenden Rail Station | State/Province: England | See map | Lens: Canon EF-S 17-85mm f4-5.6 IS USM

Some experienced photographers, particularly those with a background in traditional film photography, claim to be able to “see” a scene in black and white, visualising how a monochrome version might work. This focuses on the tonality, and ignores the colours in the scene.

I’ve been trying to do this, with a little success, and I’m quite pleased with this scene I captured at Sissinghurst last weekend, where I managed to visualise in advance the effect of the statue against the hedge, and the shadow on the lawn.

But I’ve realised I can only do this where the scene is dominated by a single colour. In this case, it was all different shades and tones of green (or grey). As regular readers and friends will know, colour is very important to me, and when the colour palette is richer, I find it very difficult to ignore my interest in the colours and focus only on the tones.

I wonder whether the best black and white photographers are just less interested in colour in normal life, or whether they can switch their vision of the colour on and off, something I can’t do?

View featured image in Album
Posted in Photography | Leave a comment

The Challenge of Serenity

In the Chapel of Onzelievevrouw (Our Beloved Lady) Basilica in Maastricht
Camera: Canon EOS 7D | Lens: EF-S15-85mm f/3.5-5.6 IS USM | Date: 22-07-2011 17:16 | Resolution: 5160 x 3434 | ISO: 1600 | Exp. Time: 1/19s | Aperture: 5.59 | Focal Length: 17.0mm (~27.5mm) | Location: Mercure Maastricht Airport 3 | State/Province: Limburg | See map | Lens: Canon EF-S 15-85mm f3.5-5.6 IS USM

Our Summer city break this year was a short trip to Maastricht in Holland. No, I didn’t have a treaty to sign, but it’s still a charming old European town, with great architecture and great shopping. The high point was the last live music event of our Summer, a concert fronted by the Dutch violinist Andre Rieu. We didn’t know quite what to expect, vaguely thinking about violin solos. What they actually provide is a bit like a Dutch “Last Night of the Proms”, performed outdoors, with musical inputs ranging from a South African gospel choir to the current Three Tenors. Andre Rieu is just a great showman (I could follow much of what he was saying even though I don’t speak Dutch), and seems to treat his beloved Stradivarius a bit like other “front men” treat their tambourine or harmonicas – mainly something to keep the hands busy!

Talking about things beloved, the photo is from the Chapel of Onzelievevrouw (Our Beloved Lady) Basilica. The chapel is an “island of serenity” in a bustling town, and many of the visitors stop to pause here. Apparently they get through roughly 1000 candles a day…

I really wanted to capture this photographically, but the challenges are substantial. Firstly, the dynamic range demands HDR. Even allowing the candle flames themselves to blow out the range must be 14 stops from the candle bodies to the shadows, and I didn’t just want a white stripe across a black background 🙂 Flash would be completely unacceptable killing both the beautiful reflective mood, and also the very subtle lighting I was trying to capture. Using HDR gets to the next problem: movement. Not only are people coming and going all the time, but of course the camera flames themselves are moving. It wouldn’t be acceptable to use a tripod, and I didn’t have mine anyway. All these place a lower limit on the shutter speed, and require a fairly high “working speed” to capture the few moments when the other people are motionless.

This wouldn’t matter in a typical outdoor situation or even a well lit interior, but away from the candle tips the light levels in the Chapel are very low. At ISO 1600 I was looking at f/5.6 and 1/20s for the “nominal” exposure. That’s more or less the limit of my lens, and I wouldn’t want a much wider aperture for this scene in any case. This in turn implied a challenging 1/5s shutter speed for the “+2” shot. I didn’t want to crank up the ISO any further, as the noise would be unworkable in an HDR image.

Several attempts later, this was the best result. This Japanese couple paused just long enough to give me a nice composition without human movement. For some reason I can’t get a high-quality result using all three frames – I must have moved the camera between frames slightly more than the software’s limits – but the nominal and “-2” exposure combined well in Photomatix Pro using the exposure fusion method. Although there’s not quite as much shadow detail as I hoped for I think it works, but it also illustrates the limits of current digital photography.

View featured image in Album
Posted in Photography, Reviews, Travel | Leave a comment

Image Stabilisation – Know Your Limits?

Ceiling detail from the Teatro Tomas Terry, Cienfuegos, Cuba
Camera: Canon EOS 7D | Lens: EF70-300mm f/4-5.6 IS USM | Date: 20-11-2010 17:48 | ISO: 800 | Exp. bias: -2/3 EV | Exp. Time: 1/13s | Aperture: 5.0 | Focal Length: 140.0mm (~226.8mm) | Lens: Canon EF 70-300mm f/4-5.6 IS USM

I’ve blogged previously on the other merits of Canon’s wonderful EF 70-300mm f/4-5.6 IS USM lens, but not really its image stabilisation characteristics. This shot from Cuba shows how good the lens is in that respect. The above is an interior detail from the Teatro Tomas Terry in Cuba, shot handheld in very low available light, at 140mm and with a 1/13s shutter speed. I’m very happy with its sharpness. Some of this may be down to my own steadiness, but it does seem that I can genuinely go to speeds 10 times slower than the traditional “1 over the focal length” rule. I’d be interested to hear what other people have found with similar lenses.

View featured image in Album
Posted in Cuba Travel Blog, Photography | Leave a comment

Low Cost Geotagging Using Bibble

I decided a while ago that it would be useful to “geotag” my photographs, i.e. to automatically record the location from which each is taken and add that to each images’s metadata. As my next photographic trip is to Iceland and I rate my chance of correctly remembering and spelling all the Icelandic names as about 0%, this could be very useful.

I looked at commercial solutions, but they have several drawbacks, including the need to carry at least one more gadget, and some questions about how they would fit with my photographic workflow. Then I realised that I could achieve a similar result using just my new mobile phone and some low-cost software which can integrate neatly with my Bibble-based workflow. Read how my solution works in this article.

Read the full article
Posted in Photography, Travel | Leave a comment

Review: Don’t Stand So Close

A review of "The Eagle"

As a general rule, it’s good for an action photographer to get close to said action, but I’ve recently seen a few films that demonstrate there’s a limit. One key example was “The Eagle”. It’s a stirring tale, full of great human lessons, and a great romp through Roman Britain and Celtic Scotland. I liked the visual feel, even if some of the Celtic warriors looked more African than Scots, and counter to some reviews I enjoyed the performances of both leads, as I thought Channing Tatum’s calm portrayal of the Roman an interesting contrast with the more intense performance of Jamie Bell.

The area of concern, an unfortunate one for an action film, was the fight scenes. The camera was right in with the whirring blades, and this led to two problems. The first, which several reviewers have commented upon, was that it became impossible to follow the sequence of events, or the “big picture” view of the battle’s progress. You just couldn’t work out who had done what to whom. A key Roman character is killed in the final battle, yet neither Frances nor myself could work out when, or at whose hands. This stands in contrast to, say, Ridley Scott’s direction in “Gladiator”, when you are never in doubt about what has happened.

The other problem is more personal, and I don’t know how many people it affects. My brain obviously process visual information quite quickly, and at a certain point the world’s most popular optical illusion breaks down. If, say, a sword scythes across a large cinema screen in less than a second, I see it as a series of distinct jumps as my brain discerns the movement between successive frames. While at one level I follow movement, at another I’m distracted by “spotting the jumps”. This only happens in relatively extreme circumstances, with quick movements across large screens, but it’s consistent under those circumstances.

“The Eagle” is not the only film I’ve recently seen which demonstrated these problems. This excessive closeness to the action seems to be a developing trend. directors and cinematographers need to test their work by seeing whether someone sitting towards the front of a large cinema can follow it. If not, a step back might improve things considerably.

– Posted using BlogPress from my iPad

Location:Bookham Rd,,United Kingdom

Categories: Photography and Reviews. Content Types: Film.
Posted in Photography, Reviews | Leave a comment