| Weaver's hand | |
| Camera: Panasonic DMC-GX8 | Date: 17-02-2017 11:39 | Resolution: 5184 x 3456 | ISO: 1600 | Exp. bias: -66/100 EV | Exp. Time: 1/40s | Aperture: 4.5 | Focal Length: 30.0mm | Location: Weaving village at In Paw Khone | State/Province: Inbawhkon, Shan | See map | Lens: LUMIX G VARIO 12-35/F2.8 | |
I’ve been asked a number of times recently how I manage to write my blog during the often hectic schedule of my trips. It is sometimes a challenge, but it’s something that I want to do, and so I make it a priority for any "down time". I don’t see it as a chore, but as a way of enhancing my enjoyment, re-living the best experiences, working through any frustrations, and building valuable memories. If I’m travelling without Frances then there’s a lot of overlap with my report home, and if we’re travelling together then drafting the blog has become an enjoyable joint activity for coffee stops and dinner times.
That said, there are a few tricks to make the task manageable, and I’m happy to pass on some of those I have developed.
There’s no great magic to the writing. The main ingredient is practice. However I do spend quite a lot of time thinking through what to say about a day, trying to draft suitable paragraphs in my mind. If it was good enough for Gideon it’s good enough for me :). It is useful to capture ideas and even draft words whenever you get an opportunity, even on the go: travel time in buses and coffee stops are ideal. I just start drafting an email to myself on my phone, which can be saved at any time, reopened to add more as the day goes on, and sent before I start writing the blog.
The other important tool is a blogging app on your device which works offline and can save multiple drafts locally. I use the excellent Microsoft Live Writer on my PC, and the WordPress app on my phone and tablet, but any decent text editor would do. I would strongly counsel against trying to do travel blogging directly onto an online service – you will just be too obstructed by connectivity challenges.
Images are the other part of the equation. It’s very easy to be overwhelmed by the sheer volume of images, especially if you shoot prolifically like I tend to do, and if you have a relatively slow processing workflow. The first trick is to shoot RAW+JPG, so you always have something which you can share and post, even if it’s not perfect. As I observed in a previous post, you don’t need perfect in this context, and it would be rare if you didn’t from a day’s shooting have a least one image good enough in camera to share.
However, as long as I have at least some time, I do try to perform a basic edit (filter) on my shots, and process at least the one or two I want to publish to my blog. That requires a robust but quick and efficient workflow. Different photographers work different ways, but the following describes mine.
Importantly, I don’t use LightRoom or the image management features in Photoshop. Neither do I use Capture One’s catalogue features. All my image management takes place directly in Windows, supported by the excellent XnView and a few tools of my own making. I find that this is both quicker, and puts me in direct control of the process, rather than at the mercy of a model which might not suit.
The first step is to copy (not move) the images off the memory card. If I have only used one card in a session, I find it perfectly adequate to just connect the camera via USB – this works quite quickly, and avoids fiddling with card readers. As long as I have sufficient cards I don’t re-format them until I’m home (just in case something happens to the PC), nor do I do much in-camera deleting, which is very cumbersome.
In terms of organisation I have a top-level directory on each laptop called "Pictures" under which is a directory called "Incoming". This is synchronised across all my computers, and holds all "work in progress". Under that I have two master directories for each year or major trip, and then subdirectories for each event. So for Myanmar I will have top level directories called "Myanmar 2017" (for output files and fully-processed originals) and "Myanmar 2017 – Incoming" (for work in progress). Under the latter I would typically have a directory for the images from each day’s shooting, e.g. "Lake Inle Day 2". On the "output" side I will typically have a directory for each location, plus one for all the originals (RAW files and Capture One settings), but I could easily also end up with others for video, and particular events or topics such as the group.
Having copied the pictures over to the right working directory, I fire up XnView. The first step is to run a batch rename process which sets each image filename to my standard, which includes the date (in YYYYMMDD format), the camera and the number assigned by the camera, so all shots from a given camera will always sort alphabetically in shot order, and I can immediately see when an image was taken and on which camera. After that I run a script which moves all "multi-shot" images into sub-directories by type (I shoot panoramas, HDR, focus blends and 3D images each using a distinct custom mode on the camera) and takes these out of the main editing workflow.
The next step is to "edit" the images, by which I mean filtering out the bad, poor, and very good. Because I have JPG files for each shot, I can set XnView to sort by file type, and quickly scan all the JPG files in full screen mode, tagging each (using shortcut keys) on the following scheme:
- Two stars means "delete". This is for images which are beyond use: out of focus, blurred, subject not fully in the frame. These will be moved to the wastebasket, and once that’s emptied, they are gone forever.
- Three stars means "others". This is for images which are technically viable but which I don’t think merit processing. The obvious candidates are things like alternative people shots where the expressions weren’t ideal (but I have a better shot) or where I took a few slightly different compositions and some obviously don’t work. However this is also where I park duplicates or the unwanted frames from high-speed sequences. When I get home the JPGs will be deleted and the RAW files moved to an old external hard drive to free up disk space.
- Four stars means "OK". This is for technically and compositionally adequate images, albeit which may not be the best, or may need substantial processing work.
- Five stars means "good". These are the images which leap out at a quick viewing as "yes, that’s going to work".
Having tagged the images in the working folder, I have another script which deletes the two star images, moves the "others", and creates a .XMP file marking the five star images with a colour tag which can be read by Capture One. I can also copy the in-camera JPG versions of the 5 star images as a starting point for my portfolio, although these will be replaced by processed versions later.
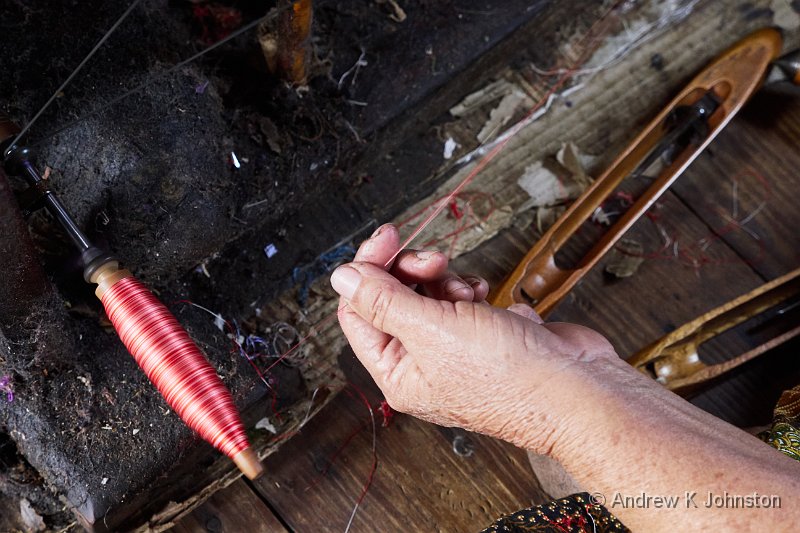
The thing about the tagging process is to keep going, quickly, but err on the side of caution (so tag borderline delete as 3 star, and borderline others as 4 star). I can usually work through at an image every one or two seconds, so the first filter of an intensive shoot of 500 images takes less than 20 minutes. At this point I have typically reduced the retained images by 40-60%, but that varies by subject matter and the percentage of rejects can be much higher for challenging subjects such as high-speed action but also people other than professional models, where a lot get rejected for poor expressions. The reason I’ve chosen the image at the top is that I love trying to capture hands at work, but that’s another subject with a high "miss" rate. I also find that I fairly consistently mark about 4-5% of shots as 5 star.
I don’t just delete the "others", because there is the occasional case where my selected shot of a group turns out to have a major flaw, and it’s worth reviewing the options. More importantly, for family events, weddings and the like there’s the occasional "didn’t anyone take a picture of Aunty Ethel?" I rescued a friend of mine from a serious family bust-up when it emerged that the official photographer at his wedding hadn’t taken a single photo of my friend, the groom’s parents! On the case, I found a shot in "others" which after processing kept everyone happy.
At this point, and only then, I start up Capture One and navigate to the target working directory. It takes a minute or two to perform its first scan, and then I can change the sort order to "colour tag", and there are the best of the day’s images, right at the top of the list ready to select a couple for the blog and process them. 90% of the time I restrict processing changes to the crop and exposure (levels and curves) – I wouldn’t usually select for the blog any image needing more than that. Finish the words, and I’m ready to post my blog.
From plugging in the camera to posting typically takes around an hour. There’s some scope for multi-tasking, so I can work on the words (or get a cup of tea) while the images are downloading from the camera, or while posting the images to my website (which in my case is a separate step from posting the blog). As a by-product, I have performed my first edit on the shoot, and have more or less the best images prioritised for further processing.
And I have an enduring and sharable record of what I did on my holidays!


 Email me
 Others
 Thoughts on the World (Main Feed)
 Main feed (direct XML)