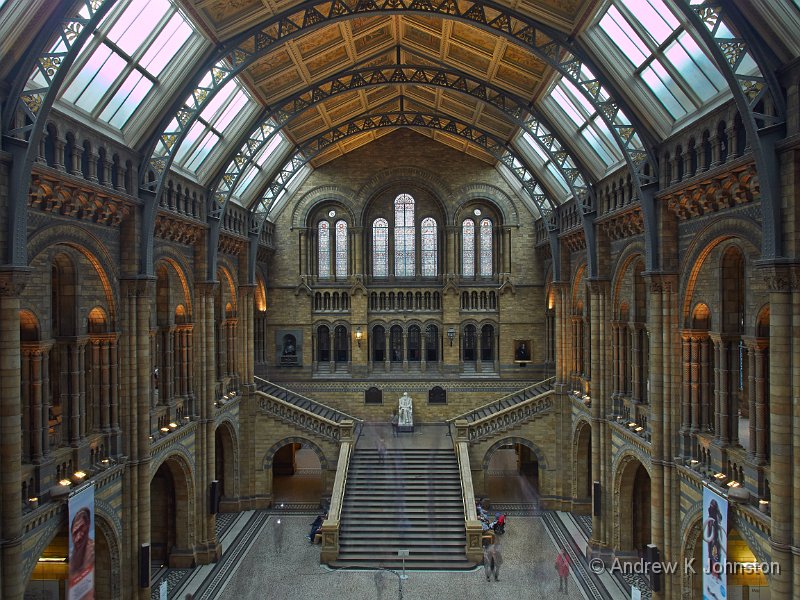
| The single shot version of median blending - central gallery of the Natural History Museum on a busy afternoon! | |
| Camera: Panasonic DMC-GH4 | Date: 05-09-2014 16:37 | Resolution: 4608 x 3456 | ISO: 100 | Exp. bias: 0 EV | Exp. Time: 15.0s | Aperture: 11.0 | Focal Length: 12.0mm | Location: V&A Museum | State/Province: England | See map | Lens: LUMIX G VARIO 12-35/F2.8 | |
I have been using multiple shot techniques almost as long as I have been interested in photography. My earliest stitched panoramas were in the days when you got a spare set of prints and took out the razor blade and sellotape. I also have a rather nice picture of Frances using the "soft focus" double exposure setting of the Canon AE1.
However things really got going when I moved to digital. For several years I have done stitched panoramas and HDR. I have also experimented with focus blending to generate images with infinite depth of field, although I haven’t yet got my technique quite right to get the best results. All of these are well-established, well-supported techniques with good support in terms of both documentation and software.
The digital community moves on, and new techniques and capabilities are appearing. The new Olympus OMD cameras support an in-camera multi-shot technique to build ultra-high definition files. Another new technique which has caught my eye is the idea of "median blending": take a large number of pictures of a scene with annoying moving objects, such as other tourists 🙂 and then blend them together to find the median colour at each point. As long as you have enough pictures in the stack that there are several "clear" at each point, all the annoying moving objectsTM magically disappear. The only problems with this are that it really can’t be done hand-held unless you are very steady, and the only really effective software support is in the full version of PhotoShop, which I’m loathe to invest in. Other software options are on the way, and I can then see this becoming a regular part of the toolkit.
In the meantime, I’ll continue occasional use of the original single-shot version of this process. Take a long enough exposure of a scene with annoying moving objectsTM and most of the annoying moving objectsTM disappear of their own accord, or become faint ghosts at worst.
In the last week, I’ve identified another multishot technique which may get a significant workout. We’re both fans of 3D films. In Paris, we saw an exhibition of Jacques Lartigues’ photography, which included some of his stereographic images. What the gallery had done is to scan these, and convert the slideshow to a short 3D film which could be viewed with standard cinema 3D glasses, and it got me thinking…
I now own a 50", 4K, 3D display. It’s called my television. We had already concluded that slideshows on the TV are the best way to show my photographs to Frances and visitors. The "lights on" moment was to question whether I could generate my own 3D images and display those in the same way. It turns out that this is perfectly possible, but surprisingly poorly documented on the interweb.
Option 1 – The Panasonic 3D Lens
This is easy. Micro four-thirds cameras can use a special lens from Panasonic. It’s not very expensive, and not much bigger than a lens cap. Put it on, and the camera goes into 3D mode, and creates special image files in the .MPO format. Put these on a memory stick and view them on the TV, the TV goes into 3D mode, you put on the glasses, and voila!, 3D images.
That’s the good news. The bad news is that the implementation’s a bit limited. First the lens is fixed focal length, fixed focus, fixed aperture. The focal length is 68mm-e, on the telephoto side of normal and not a length I’d often use for static subjects. The other significant limitation is that like most in-camera implementations of HDR, panoramas and so on, you just get a "pre-baked" .MPO and .JPG file, with no RAW. You have to get all the image characteristics right first time in camera, and there are some restrictions on what you can do in any case. Worse, the output is an odd 1024×1824 resolution, which isn’t even enough to fill a full HD display, let alone 4K.
It’s a useful trick to have, especially for moving subjects, and as the lens is tiny I’ll carry it around, but the conclusion is "not good enough".
Option 2 – Blending Two Images
There’s an obvious alternative, at least in principle. Take a shot, move the camera right about 6cm, and take another of the same scene. Then somehow "merge" them into an MPO file, similar to a stitched panorama.
The challenge is that it takes a lot of googling to find some software capable of doing the merge. Eventually I tracked down the brilliant little program StereoPhotoMaker ("little" is right – it’s a single 2MB executable file). It does what it says on the tin – takes a pair of images, aligns them, and saves the result to various 3D formats, including my target .MPO file. Amazingly for such a small program it’s not just limited to that, and includes a number of clever adjustment and file management features, although realistically in a RAW-based workflow you are going to do most of the image adjustment and management externally.
The great thing is that this process isn’t limited in the same way as Option 1. It works with any lens, any settings, and takes the full resolution JPGs produced after anything Capture One can do, so the resulting images are more than capable of driving the 4K TV to its full capability. Like stitched panoramas, if you’re working on a tripod there’s no theoretical reason why you can’t combine it with other multishot techniques, so you could in theory produce a 3D focus blended HDR with annoying moving objectsTM automatically removed, although that would take a bit of discipline and patience to get the right shot list :).
The only real drawback is the one common to most multishot techniques – it really requires a static scene, unless you are going to manage the moving objects via either median blending or very long exposures.
There are a few annoyances to resolve, like why my TV can see the files on a memory stick but not over the network, but I’ll get there…
This is simple, easy and requires no special equipment or technique change. All I need to do is remember to take a second shot of any suitable scene, and this approach could produce some great results.
Option 3 – Two Cameras?
Stereographic imaging has been around for about 150 years. For most of that time photographers used a simple technique which works with any subject, static or not, and doesn’t rely on clever digital manipulation. Stick two cameras side by side, and take two shots simultaneously.
Although traditionally this is done with two identical cheap cameras, I’m not convinced that’s essential. The cameras do need to use the same sensor, and the same lens, but as I have two copies of the excellent, featherweight Panasonic 12-42mm power zoom and a growing collection of Panasonic bodies that shouldn’t be a challenge. Knocking up a suitable bracket should also be fairly straightforward. In my loft I have a device which might provide a very useful basis for this – a "pistol grip" camera mount which includes a trigger for the remote release – and it might be appropriate to use standard tripod quick-release plates to speed assembly and disassembly. With the Panasonic remote release system based on standard 2.5mm jack plugs the wiring should also be fairly straightforward.
The challenge is to make sure that both cameras and both lenses are set identically. There’s obviously a simple manual process for this, but it’s potentially a bit of a faff. However I’m wondering if the Panasonics’ ability to be controlled over Wifi from a phone is the answer – develop a bit of software which reads the settings from the "master" camera and applies them to the "slave". That’s maybe a bit more work, but worth investigating.
I’m torn as to whether this is worth the effort, and the extra weight to carry, or not. I have a bit of a history of spending time and effort to do something complicated, and then not using it very much. Watch this space…


 Email me
 Others
 Main feed (direct XML)