Underwater White Balance
If you're lucky enough to own either a waterproof camera, or a waterproof housing for your digital camera, you'll have experienced the problem of trying to correct for the extreme blue cast of shots taken underwater.
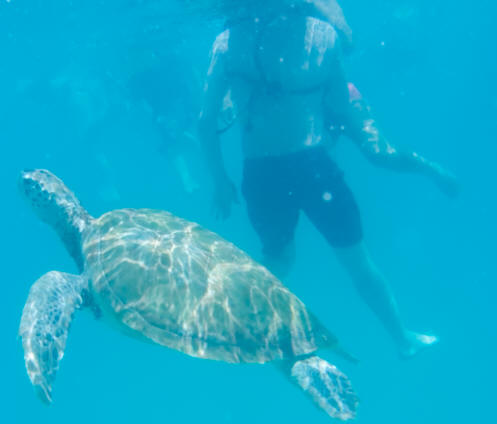
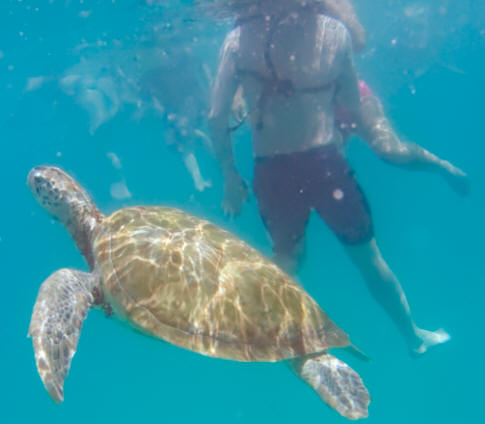
Here, as an example, is an uncorrected RAW image taken on a Canon Powershot S70 with a waterproof housing.
The problem is that there's little reliable advice on how to correct this. There are a few articles on the web, but I haven't found any to provide a reliable and repeatable process which can be applied to "casual" underwater photography.
After a fair amount of research and experimentation, here's my analysis of the options available, and a suggested technique which I have developed and which I haven't seen documented anywhere else.
Option 1: Carry a Waterproof White Card and Use Custom White Balance
Arguably this is the "right" way to do it. If your camera supports custom white balance, you can photograph a known white target in the same lighting, and then correct either in camera or later in software (e.g. by using the "click white" tools in PhotoShop/Elements). This works whether you shoot RAW or JPG, and independent of camera capabilities.
However...
This is definitely not suitable for casual/social snorkelling or diving. You will get mercilessly and rightly ribbed if you carry a large white card with you on that Caribbean catamaran trip. But the disadvantages don't end there. You will need to re-adjust the balance (or re-photograph the sample target) for each change of depth, background or light, which can happen on a minute to minute basis in many situations. It's a solution you have to prepare and use carefully, not after the event.
Option 2: Shoot RAW and Experiment with White Balance Presets
If (like the Canon S70) your camera supports RAW you can try adjusting the white balance in your RAW processing software. You can certainly take pot luck with the white balance presets and it may work for you. Canon recommend the Sunny/Daylight setting, but in my experience this is still far too blue. Here's our sample shot set up that way:
Option 2A: Shoot RAW and Experiment with Custom White Balance Controls
Beyond the presets, you can try twiddling the white balance settings manually. I don't know about you, but I find this very difficult to control precisely or predict which combination works. I have even tried to replicate the Canon's "Underwater" setting for JPGs, but without success. Also sometimes even at "extreme" settings, it's still not quite right.
This is even more "pot luck" than the presets. You may be fortunate, but you could do a lot of experimentation without success.
Other manual colour adjustments are similar. You may be fortunate, but I haven't found a reproducible solution.
Option 3: Use the "Underwater" WB Setting
Some digital compacts have an "underwater" white balance setting, the Canon S70 among them. Canon's preset sets the equivalent of a temperature of 3147ºK and tint -100 in the RAW convertor. However, like any other preset this may be right, but more often not. I find that the pictures are still dominated by green/blue. Also this doesn't help if you want to shoot RAW.
Option 4: Use the "Click White" Option
Your image editor (or RAW convertor) will probably have a "click white" option which will remove the colour cast if you can identify anything which is reliably white, black or mid grey!
The first problem is that you may not have such an object in your picture, unless you have a white balance card or similar - in which case see option 1 above. Nothing in our sample picture would suffice.
The second problem is that the colour cast can vary significantly over your reference object in any real lighting. I usually find that I spend ages clicking round possible targets trying to get a realistic result with this method, and the results are usually quite extreme.
Option 5: Use the Levels Method
Which finally brings us on to my recommended technique - the levels method. This works both with RAW files or JPGs/TIFFs, as long as:
- Your subject has reasonable spread of tones in various colours. The turtle's shell and human clothing and skin tones in our sample picture are fine,
- Your picture editor or RAW convertor allows you to tweak the levels for each colour channel separately. I use Bibble Pro as my RAW convertor, and Photoshop Elements as an editor, and both those have this capability.
To understand what we're trying to do, just take a look at the RGB histogram for our sample shot:
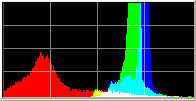
As you can see, the blue and green channels peak to the right, and the red channel to the left. In a "balanced" shot meeting the first condition above, they should all be in roughly the same place. This is what we're going to try and achieve.
First, set up your workspace. If you're developing a RAW file start with either "as shot" or daylight/sunny white balance, and turn off any automatic levels adjustment. Also, work in a wide colour space like AdobeRGB if you have the option, and make sure there is no automatic conversion to a different colour space when you save the file. If you need an sRGB version of the file, it's better to convert the saved file manually as a separate step.
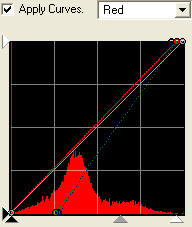
Now change your levels control to the green channel, and adjust the levels so that the black and white points are aligned with the "shoulders" of the histogram, as shown. Don't make any adjustment to the midtones or "gamma" setting:
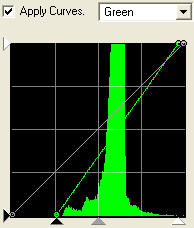
Repeat for the blue channel.
Now change to the red channel. Adjust the red "white point" (the right hand slider) to the edge of the histogram as shown. You almost certainly won't be able to do anything with the "black point" slider as the red channel will probably be clipped at the shadow end:
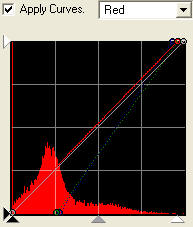
Finally, very carefully, adjust the red midpoint control to the right until the colour of the picture is as neutral as possible, which will drag the peak of the histogram towards the centre of the range as shown. The trick is to watch an area which should be a fairly neutral colour (such as the swimmer's shorts in our example), and when you can just see a red tint back off slightly:
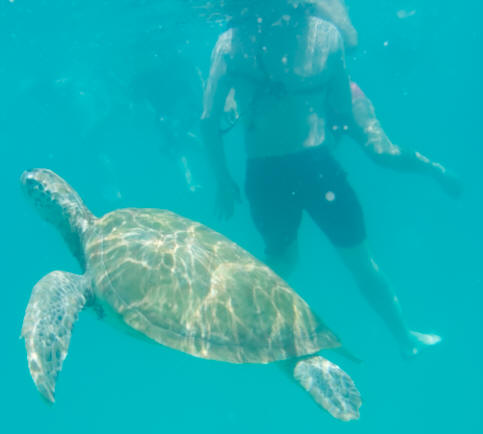
This is how the picture looks:
OK, this is never going to be the world's greatest underwater photograph, but at least the turtle is now the right colour! As a by-product, we've also pretty much optimised the contrast.
If you want to tweak settings further, save this version of the image as a JPG or TIFF, then re-open in your normal image editor. In particular you may want to modify the colour profile, and adjust the overall brightness and saturation. Be very careful with the latter - there will not be much headroom and it will be easy to "clip" some colours.
Hopefully this technique will help you sort out your underwater shots. It's certainly what I now use consistently.
Comments
4 Responses to Underwater White Balance
Clare on 16 October 2011 at 06:01
Thanks so much for your tips on underwater white balance! I bought myself an Panasonic lumix underwater camera for a trip to Vanuatu, and your guide on fixing the colour has been invaluable, the fish and coral just seem to ‘pop’ out of the photo once fixed with the JPG method (option 5). It’s made all the difference.
Thanks again!
Jennifer on 25 June 2013 at 06:29
So, I’m in the market for a new camera, and white balance it my most obvious nemesis. Should I go with a dive-friendly Sealife DC1400 that is made (apparently) for us scuba divers or should I go with a land camera with housing, such as the Olympus TG-2?
Last camera was a Reefmaster Mini with strobe. Sorry to be so behind the eight ball, but I’m just getting into underwater photography and would like to have something decent for my 200th dive in 12 days.
Muchas gracias,
Jennifer
Andrew on 25 June 2013 at 08:31
Hi Jennifer,
The most important thing is that you choose a camera which can shoot RAW. A camera designed for diving would work well, and I get great results with the Canon Powershot G series in a housing.
STAY AWAY from cameras like the TG2. You obviously haven’t read my review of that camera!
Geoff on 15 June 2014 at 10:19
Excellent article. I managed to take some pictures (Jpegs) in good sunny daylight whilst the camera’s (Powershot G9) white balance was accidentally set to ‘Underwater’ … don’t ask, huh!… Kinda the opposite side of the ‘same coin’ as it were. And so depending on a lot of other environment variables, some pictures ‘came out’ rather shy in the Cyan/ Blue and somewhat enhanced in the Red/ Yellows. Using Paint Shop Pro (X2 of ~2008 vintage) and its Layers/Levels by color tool, much as your article describes, I have found that careful tweaking yields a much improved visual color balance – the Cyan/Blue components now seem to have returned to the skies… and the very Red soils of Ibiza are not now Chilli Red-Hot! Similar corrective effects also obtained using layers/curves, although that is visually a little trickier in PSP, but the results may be a tad smoother given time to play as this mode changes contrasts across the spectrum as well as color by channel. I also tried PSP’s Color Balance tool, but found that it has a tendency to ‘clip the whites’ and so cloud edges tend – rather annoyingly – to lose definition. And Yes, keep a good eye on the changing Histogram as one goes. Occasionally, I found that ‘clipping’ a very small amount off the ‘Top’ of Blue could yield good effect rather than attempting midtone adjusts (the original article refers to ‘Reds’ here and midtone adjust!) … But go very carefully at deliberate clipping, too much and you are in deeper trouble than when you started.
Geoff T – June 2014
If you'd like to comment on this article, with ideas, examples, or just to praise it to the skies then I'd love to hear from you.


 Email me
 @TweetAndrewJ
 Others
 Thoughts on the World (Main Feed)
 Main feed (direct XML)