The Micro Four Thirds Lens Correction Project
Although most Micro Four Thirds (MFT) lenses are tiny, the cameras produce great JPG files with apparently little or no geometric distortion. They do this by applying corrections in camera, and the correction parameter data is also stored with the RAW file. Unfortunately this data is only useful if you can read it, and most RAW processors can't.
Although there's no obvious reason why not, Panasonic and Olympus have not published the specification for this data. That leaves those of us who want to use a RAW processor other than LightRoom or SilkyPix struggling to get decent results with our MFT images.
Building on some excellent work done by "Matze" (thinkfat.blogspot.co.uk/2009/02/dissecting-panasonic-rw2-files.html)and Raphael Rigo (syscall.eu/#pana) I decided to have a go at implementing a parser in my CAQuest plug-in for Bibble/AfterShotPro. However although getting the raw data is fairly straightforward I have discovered that the algorithm is more complex than we thought, and seems to vary from lens to lens.
The purpose, therefore, of these pages is to host a "crowd-sourcing" exercise to try and get several eyes on the problem. As we uncover algorithms which work well for one lens or another I'll publish them here, and also build them into CAQuest. Over time we may come to completely understand the complete MFT algorithm, and our work will then be done. Of course, if one of the MFT partners wants to help by publishing the algorithm, that would also be perfectly acceptable :).
How This Works
The objective is to find an algorithm which derives the parameters a, b and c for a standard geometric correction programme from the embedded correction data. This algorithm should work the same for all settings of a given lens, but will be different for different lenses.
For example, you might find that for a given lens a is always value 11, b is value 4 and c is value 8 (I'll explain this in a minute). However in most cases it will be more complicated than that.
Sample RAW and corresponding JPG files for various lenses are held on this site and can be downloaded as you wish. Where possible we have RAW+JPG pairs so you can see how the image is corrected in camera, but if you prefer to experiment with manually profiling the pictures to get ideal parameters that's fine.
What We Already Know
The correction data is a set of 16 16-bit integers, referred to as values 0 to 15. Each can be used either as a signed integer, or as a signed real number (by dividing by 32,768). An example looks like this:
| Val | Hex | Decimal | Double | ------ | Val | Hex | Decimal | Double |
| 0: | 50ad | 20653 | 0.63028 | 8: | fd87 | -633 | -0.0193176 | |
| 1: | df00 | -8448 | -0.257813 | 9: | 0057 | 87 | 0.00265503 | |
| 2: | 021a | 538 | 0.0164185 | 10: | 01f4 | 500 | 0.0152588 | |
| 3: | 0223 | 547 | 0.0166931 | 11: | 003d | 61 | 0.00186157 | |
| 4: | ffac | -84 | -0.00256348 | 12: | 0b2c | 2860 | 0.0872803 | |
| 5: | fd50 | -688 | -0.0209961 | 13: | 024b | 587 | 0.0179138 | |
| 6: | 021f | 543 | 0.016571 | 14: | 0ee0 | 3808 | 0.116211 | |
| 7: | a801 | -22527 | -0.687469 | 15: | 605e | 24670 | 0.752869 |
Values 0, 1, 14 and 15 form a complicated checksum. Raphael's article and code explain this. It's not clear if these values contribute to the correction data at all.
Value 12 may track the camera, or it may be some sort of algorithm version. Raphael reported that it's always 2500 for his GX1, but I'm seeing 2860 for more recent samples.
Project Resources
I have a blog, recording my findings (both positive and negative): www.andrewj.com/blog/mft
There's a discussion hosted at the Corel User to User Forum: Discussion
Latest versions of CAQuest with MFT support:
For B5: CAQuest.1.6.2.bzplug
For ASP: CAQuest.2.3.2.afzplug
How to Develop an Algorithm
First, download and install the latest version of CAQuest for ASP or B5 (see above).
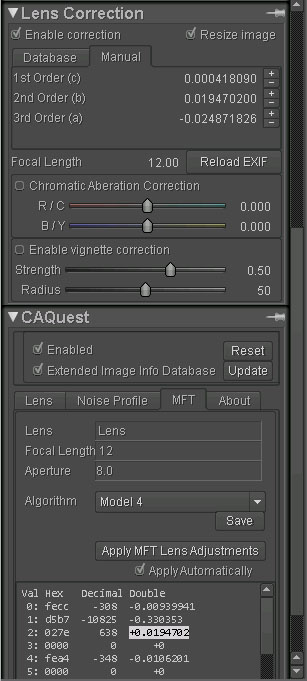
Set up Bibble/ASP so that you can see CAQuest and the standard "Lens Correction" tool together. It may be be easiest to pin one next to the other, or to arrange them above one another as in the example.
It's probably easiest to make sure CAQuest is enabled by default. It won't do anything else to your images if you don't select any of the other "automatic" options.
You must rebuild CAQuest's "Extended Image Info Database" for the directories holding your test shots. Otherwise this will not work. For the rebuild to work exiftool must be installed either on your path or in the same directory as the main Bibble executable.
Open a RAW file from a Panasonic MFT camera, and the correction data should be populated into the bottom panel of CAQuest.
Adding Lenses to Bibble's Profile Lists
You'll notice in the example that the "Lens" value in CAQuest isn't populated, and as a result you can't save the default algorithm for a Lens. To get this working you simply need to add the name of your lens (as reported by ExifTool etc.) to the PanansonicLensTable file which will be somewhere like: "C:\Program Files (x86)\Bibble Labs\Bibble 5\supportfiles\Profiles\LensProfiles\profile_panasoniclenstable.txt"
Update 21/9/12: The latest versions of the plugin now work around lenses which are not registed with Bibble/ASP. As long as you have refreshed the "extended EXIF information database" this should no longer be a problem.
Developing Algorithms
There are two ways to derive the algorithm:
The Trial and Error Way
First, try the existing algorithms. Simply select one of the values from the "Algorithm" drop-down, and click the "Apply MFT Lens Adjustments" button. If you don't like the results, choose another algorithm and try again.
When you've got a reasonable result, you can experiment with changing the correction values manually, and see what gets closer to an accurate correction. Then see if one of the extracted data values (or some combination) is a better fit for that value.
When you think you've got an algorithm which works, edit the file CAQuestMFT.xml in the top Bibble/ASP user directory, and create an algorithm entry for your formula. Then you can restart Bibble/ASP and see how well it works across the lens range.
You can easily cut and paste values between the list in CAQuest and the Lens Correction tool using Ctrl+C and Ctrl+V. Just make sure that the cursor is in the right place, as otherwise you'll be changing your image settings!
The Formal Way
You can also take a more formal approach. Generate a JPG without correction, profile it using profiling software, and then look for a way to derive the required correction values from the correction data in the RAW file.
Another Source
Raphael also discovered that the Adobe DNGConvertor seems to be able to make some use of the data and encode it into converted DNG files. Unfortunately again this is not straightforward but I will include the output of his DNG parser in each directory along with the sample files, in case that's of any use.
Comments
If you'd like to comment on this article, with ideas, examples, or just to praise it to the skies then I'd love to hear from you.


 Email me
 @TweetAndrewJ
 Others
 Thoughts on the World (Main Feed)
 Main feed (direct XML)